Home

Why We Need a Simpler HVAC Design Methodology

14 Comments

First of all, let me make one thing perfectly clear.  The ACCA Manual J/S/D residential HVAC design methodology is the premier methodology available today, and has been for many years.  It is the most precise, accurate and refined process for designing residential HVAC systems in the world.  It has gone through the rigorous ANSI certification process and has been reviewed and scrutinized by many of the greatest experts in the field.  It’s not perfect, but it is the best, hands down.

That being said, there is a problem.  The ACCA Manual J/S/D methodologies and the software programs that are based on them (Wrightsoft and Elite) are very complicated and have a very steep learning curve.  I first started doing HVAC design back in 1988 using handwritten ACCA worksheets.  That was probably an advantage because it forced me to understand each and every calculation and to be very careful about every assumption made along the way.  If you made a mistake at the very beginning but did not discover it until the end, you spent a lot of time re-doing the worksheets.  It was very tedious, but very educational.

Computer software programs have made the calculations much easier and allow the user to do multiple “what if” scenarios instantaneously.  ~~ What if they added ceiling insulation? – CLICK – answer.  What if they used low-E windows? – CLICK – answer. ~~  The computer software also allows users to make very BIG mistakes very quickly.  There are many, many seemingly innocent little input fields scattered throughout the programs that have huge impacts on the final results.  There are also a large number of input fields that have absolutely no impact on the final result.  A large portion of the learning curve is figuring out which is which.

Screen shot 2013-05-25 at 9.44.33 PM

This is a screen shot of a project in Wrightsoft’s Right-Suite Universal software. It makes me think of a control panel in a nuclear power plant. This is very intimidating, even to someone who is relatively computer literate. It takes years of experience and dozens of projects before someone can become comfortable with this level of complexity.

Both software packages cost over $1000 when you get most of the important features.  The software programs have also added a lot of really fancy features such as pull-down equipment libraries, estimating tools, and parts lists to name just a few.  In my opinion, these “features” sometimes clutter up the software and make it easier for people to make mistakes.

I truly, truly wish that every HVAC designer in the country used ACCA Manual J/S/D on every new home, addition, renovation and even most equipment replacements.  I honestly believe that 90%+ of existing homes would be well served to have their systems evaluated and re-designed based on ACCA Manual J/S/D.  Unfortunately, that will not happen.  Despite some really excellent training, much of it subsidized, Manual J/S/D is beyond the ability of the vast majority of HVAC contractors.  I don’t mean “ability” in terms of aptitude or intellect, but in terms of time and resources.  They don’t have the time to learn it or the time to perform it.  A good introductory J/S/D class is at least two full days long.  I personally have taught three-day classes that seemed like they only scratched the surface.

I forgot to mention that there are other manuals in addition to J, S, and D:

  • Manual H (Heat Pump Systems)
  • Manual P (Psychrometrics)
  • Manual T (Air Distribution Basics)
  • Manual 4 (Perimeter Heating & Cooling)
  • Manual TT-102 (Understanding the Friction Chart)

Again, don’t get me wrong.  I am a huge proponent for more ACCA J/S/D training.  It’s just that after teaching these classes multiple times and having performed about two thousand designs myself, I don’t think it is an appropriate level of precision for the vast majority of designs out there.

Screen shot 2013-05-25 at 11.07.43 PM

 To do a full-blown Manual J/S/D design from start to finish on a typical home would take the average user 4-6 hours.  From the time you hand them a set of plans and they turn on their computer, to the time you get back a design detailed enough to install from, takes at least that long.  This is a very expensive investment in time and energy, especially if it is just for bidding purposes and does NOT include the time it takes to draft up a presentable, full size set of plans that could be turned in to a building department for review and approval.

I strongly believe that most designs could be accomplished using a methodology that takes about one-fifth of the time.  I’ll stick my neck out and say that 80% of the residential HVAC systems being installed today could be accomplished using a far more simplified approach and result in a system that is just as good as one designed using a full J/S/D approach.

When you step back and realize that residential HVAC equipment only comes in a few sizes and residential ducting only comes in a few sizes, it makes one wonder why we are being so precise in the calculations.  Think about it.  The difference between a 3-ton system and the next larger size, 3.5-ton system, is an increase of 25%!  The difference in airflow between a 7” duct and the next larger size,  8”, is about 40%!  Why are we spending so much time on calculations that only have small impacts on the total cooling load and even smaller impacts on room loads?

I have two sayings that I use a lot in training, and in daily life for that matter.  The first I heard a long time ago and I don’t know who to attribute it to:  “Don’t waste time splitting hairs when you need to be shaving heads.”  The other is attributed to John Maynard Keynes, a famous British economist from the early 20th century:  “It is better to be approximately right than exactly wrong.”

They both relate to the need to put an appropriate amount of time and effort into what you are doing and realizing how that will impact the final result.

I believe that the current approach to HVAC design results in far too much hair splitting and results in answers that are very precise, but often wrong.  Not because the methodology is wrong, but because it is being applied wrong.

I am a firm believer that if you want to change an industry you have to do it in baby steps.  You can’t expect even a portion of contractors to suddenly start using a process that requires such an investment in time, effort and money.  That is why we need something in between the horribly inadequate design process used by MOST contractors today: a combination of rules-of-thumb and trial-and-error, and the full-blown ACCA J/S/D process.

We desperately need a more simplified design methodology.  One that is not intended to replace ACCA J/S/D in any way, but is intended to be a stepping-stone to learning the full process.  I’ve referred to it as a “gateway drug”.  The goal is to get people used to following a formal design process, albeit a greatly simplified one.  Once they get “hooked”, then we lay the “heavy stuff” on them.

I think we all want the same thing: to have homes that are comfortable, efficient, and affordable to operate.  We need to be able to make a decent living designing and installing systems, and homeowners should get what they pay for.

Advertisement

What’s a Few Degrees Amongst Friends? – Picking A Summer Outside Design Temperature

9 Comments

Merry Christmas . . . uh . . . Happy New Year! . . . ahem . . . Ok, so it’s been a while since my last blog . . . Sorry for the hiatus.  I was put on a support contract to help California Energy Commission staff write the updated (2013 code) version of the Residential Compliance Manual and that took me off line for a few months.  I have a newfound respect for the hard working folks at the Energy Commission.  They truly want the code to be fair, practical and enforceable.  That’s a much harder task than any of us on the outside realize.  All in all, there are many improvements to the code this time around.  The compliance software is still a big mystery.  The new dynamic forms will be very cool once the bugs get worked out.

The topic of today’s blog post is summer outside design temperatures and why you shouldn’t stress over them.  More precisely, there are other things far more important to stress over.

ImageA few years back, I literally had a contractor refuse to install my HVAC design solely because I chose a summer outdoor design temperature that was two degrees lower than what he thought it should be.  I was using the temperature required by the energy codes and recommended by ACCA and ASHRAE.  Granted, the project was a few miles away from the city that the temperature was measured for, and granted, it was on the other side of a small ridge.  Even if the “true” summer outside design dry bulb for the precise location of the project was 2 degrees higher than what I used, how big of a difference does that really make?  According to him, all the difference in the world.

His argument was that it would cause the A/C to be undersized and result in homeowner complaints that HE would have to deal with, not me.  First of all, as a licensed mechanical engineer, I am totally responsible for the performance of any mechanical plan that I stamp and sign.  Yes, he would be the first one they called, but if it turns out that my design was the cause of the problems, I would be responsible for fixing it and for paying for his time to respond to it.

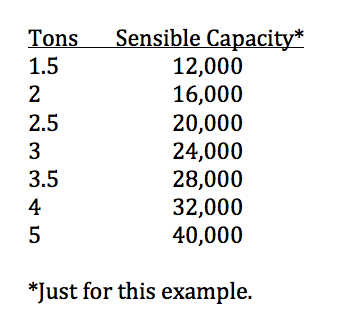
The first thing to realize is that typical residential A/C systems only come in a few sizes.  1.5, 2, 2.5, 3, 3.5, 4 and 5 ton sizes.  Roughly speaking these represent sensible cooling capacities of numbers something like 12,000, 16,000, 20,000, 24,000, 28,000, 32,000, and 40,000 btuh.  Basically, what happens is that you do your load calcs and then you pick the next size up.  So, if your sensible load is 13,000 Btuh, you would have to pick a two-ton because a 1.5 ton system would not be enough.  (Note: these sensible capacity values are very crude.  They are probably a little low.  I’m making them up because it’s easier to work with round numbers and I am too lazy to get some real numbers; however, real numbers would illustrate the exact same point.  Actual sensible capacities come from detailed performance tables published by the manufacturer and depend on indoor temperature and humidity, outdoor temperature, airflow across the coil and, of course, make and model.  Please don’t use these as rules of thumb.  I disavow any responsibility for them.  If you want to learn how to determine these for real equipment, read ACCA Manual S.)Image

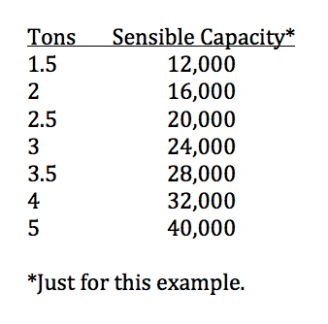
For a typical 3 to 4 ton load in a fairly new home, changing the summer outside design temperature from 98 to 100 adds about 1,000 to 2,000 btu to the sensible cooling load.  The reason that it is a fairly small number is because the indoor and outdoor temperatures establish the temperature difference (delta-T) between the inside and outside of the house.  This delta-T only affects loads caused by conduction through the building shell (heat transfer through solid walls, ceiling, etc.) and convection into the conditioned space (outside air leaking into the house).  This delta-T has no impact on the largest single source of heat entering the house in the summer – solar gains.  Solar gains can be 30-40 percent of the sensible load and do not change due to outside temperature.  Neither do internal loads.

Did you know that a house with an indoor summer design temp of 75 and an outdoor summer design temp of 100 will have about the same cooling load as a house with an indoor summer design temp of 65 and an outdoor summer design temp of 90.  (65 is not a reasonable indoor summer design temp.  Don’t use that.  Use 75.  This was just another dumb example to make a point.)

So, let’s say your sensible cooling load calc at 98 deg is 29,000.  That would suggest a 4 ton system.  If you re-ran it at 100 deg and it went up to 31,000, a four-ton system would still work.  Your load calc at 98 deg would have to be over 30,000 before changing the temperature to 100 deg would even hint that you needed to go up to the next size equipment.  In this case, that would be a five-ton system.  So, lets just say for laughs that my load calc at 98 deg came out at 31,000.  If I caved to the contractor and reran the calcs at 100 deg, they would come out at around 33,000.  Too big for a 4 ton, so we would have to go to a 5-ton that delivers 40,000 btuh, sensible.

But, are we really doing the homeowner a service by putting in a system that is oversized by 7,000 btuh (21% excess capacity).  Wouldn’t it make more sense to really look at what this means and maybe try to find a way to make the 4-ton system work by dropping the load of the house back to 32,000?  (The answer is YES.  It would make tons more sense to do that.  Pun intended.)

Also, what exactly does the summer outdoor design temperature number represent?  Currently, we use a value called the “1% Summer Design Dry Bulb”.  It can be found for pretty much any city in California (there are about 750 listed) in the 2008 Joint Appendices, Appendix JA2.2.  What does the 1% mean?  Well, you can scan through Reference Appendix JA2 and by looking at cities you are familiar with, you will notice right away that it certainly doesn’t represent the hottest day of the year.  It’s usually well below that.  What it means is that the outdoor temperature is higher than that number only 1% of the time over however many years the data was collected for.  (Also notice that they list a value for 0.1%, 0.5% and 2%.  The code requires that you use the 1.0% value.)Image
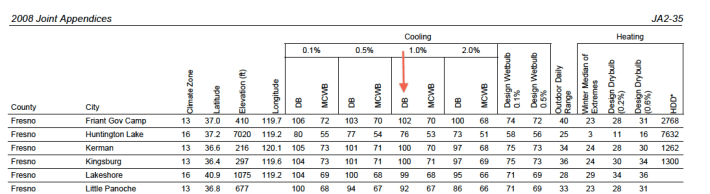
Another way of looking at this number is that 99% of the time, the actual cooling load is less than the load calculated using that temperature.  The system is perfectly sized for the few hours where the temperature is exactly the design temperature.  Let’s be generous and say that’s about 1% of the time.  This means that 98% of the time the system is oversized and will cycle on and off (or not run at all).

So, if our cooling load and cooling capacity were exactly the same, let’s say 32,000, then 1% of the time the load is greater than the capacity of the equipment and it cannot remove Btus as quickly as they are coming in.  When this happens, the temperature in the house will creep up.

If you didn’t know this already, a perfectly sized air conditioner will run continuously when the outdoor temperature is at or above the design temperature.  This is a good thing and the reason why is a discussion for a later blog, perhaps.  Just suffice it to say that cycling on and off is about as good for an air conditioner’s efficiency as stopping and starting is for your car’s MPG.

Let me also say this:  There is no such thing as a perfect load calculation.  They are a SWAG, which is only little better than at WAG (A WAG is a wild-ass guess.  A SWAG is a scientific wild-ass guess.)  Trying to calculate an exact sensible cooling load is like trying to measure the average diameter of a cotton ball with a micrometer.  Where do you draw the line?  The best you can do is document your assumptions and hope that you are right most of the time (99% is pretty good, by the way).

So, what ultimately happens during that 1% of the time when the A/C cannot keep up?  The indoor temperature shoots up like your car parked in the sun, your favorite leather chair burns skin off of your back, all the plants wilt, the goldfish are parboiled, and the kid’s crayons melt into pretty little puddles of color.  No.  None of these things happen.  What actually happens is the indoor temperature will creep up a few degrees.  If the set point is 75 degrees, it will rise up to 76, 77, maybe 78 degrees. (Seventy-eight degrees was the indoor design condition for many years by the way). How fast it takes to do that depends on the house.  One of the biggest factors is how much insulation and thermal mass the house has.  Thermal mass stores Btu’s in the winter and Bcu’s in the summer.  A “Bcu” is a Bubba’s Cooling Unit and it is equal to -1 Btu, see an earlier blog on that topic.

A fairly new, reasonably well-built house will rise about 1 degree per hour.  Whether or not that becomes a big problem depends on how hot it gets outside and how long it stays above the design temperature.

ImageThe above graph shows a hypothetical house that has the equipment sized exactly to the load.  Remember that this usually doesn’t happen when you pick the “next larger piece of equipment”.  Normally, there is some excess capacity in a properly sized system.

The red line is a typical pattern for outside temperature in the summer for a fairly hot city like Fresno or Sacramento.  This graph shows two consecutive “hot” days where the outdoor temperature exceeds the design temperature by several degrees for a few hours.  Remember, this only happens 1% of the time.

When it does happen, what happens to the indoor temperature?

The indoor temperature is represented by the blue/green/pink line.  When the line is blue, the indoor temperature is below the thermostat set point, of 75 degrees, for example.  This happens when it is cooler outside than inside.  When the line is green, the indoor temperature is right at 75 degrees.  This happens when the outdoor temperature is above 75 degrees but below the outdoor design temperature.  When the line is pink, the indoor temperature is above 75 degrees.  This happens when the outdoor temperature is above the outdoor design temperature.  Notice that if these were weekdays, the pink bump is happening mostly when no one is home.

Something else to realize is that when the line is blue, the A/C is not running at all.  When the line is green, the A/C is cycling on and off.  When the line is pink, the A/C is running continuously.  Interesting?  I think so.

So, does that graph represent something that the typical homeowner would complain about?  Possibly.  Homeowners have a right to be picky.  They are spending a lot of money on their home.  Are there things a homeowner can do to make sure this doesn’t happen (without changing the size of the A/C)?  Absolutely.  Remember, this only happens on the few hottest days of the summer and in a system with no excess capacity.  Most homeowners know when hot days are going to happen and can take reasonable precautions.

Most cooling loads are calculated with the assumption that some or all of the interior shades (drapes, etc.) open.  Keeping all of the drapes closed during hot weather makes a huge difference.  Planting shade trees around a house makes a big difference.  Even neighboring buildings provide shade not accounted for in the load calcs.  Pre-cooling or overcooling the house can help too.  This is when you set the A/C down a couple extra degrees, cooling the house down a little extra at night, and letting the thermal mass of the home help keep it cool during the hottest time of the day.

Did you know that a house with less thermal mass will have a taller hump in the pink part of the line.  A house with more thermal mass will have a flatter hump.

The vast majority of homeowner complaints about cooling that I have dealt with did not stem from undersized equipment and certainly would not have been solved by using a higher outside design temperature.  They stemmed from poorly built homes (leakier than expected, poorly installed insulation, etc.), underperforming cooling systems (poor refrigerant charge, low airflow due to undersized ducts, leaky ducts, etc.) and poor thermostat operation (turning system on and off and not letting it reach equilibrium).

ImageThis graph represents a more normal hot summer day.  Where it does not quite reach the design temperature outside.  These are far more common than the previous example.  Notice that there is no pink bump where the indoor temperature drifts up.  Realize though, that the lower the outdoor temperature is, the more often the system will cycle on and off.  This reduces efficiency.  The ultimate question then becomes, is it worth having a less efficient system the vast majority of the time just to prevent the indoor temperature from creeping up a few degrees on very hot days (which can be prevented with simple precautions).  I vote no, but that’s just me.

By the way, the same contractor that I mentioned at the beginning of this blog also told me that a 16” return duct is fine for a 4-ton system (hint: that’s not even close).  So, the moral of that story is: stop quibbling over things that we cannot control, like the weather, and start quibbling over things we can control, like quality construction, quality system design, good air flow, and proper thermostat operation.

No, It’s Not a “Pee-Trap”. So, Please Don’t . . .

24 Comments

An interesting little part of the condensate drain in a residential air conditioning system is the p-trap.  Note that it is called a p-trap because of its shape and that it is not a “pee-trap”.  That is something completely different. So, NO, that is not what that little vent pipe is for.  You’re just going to have to climb down the ladder and use the restroom like a civilized person.

I don’t know why they don’t call it a “u-trap”.  Yes, it would make more sense.  I had no say in the matter.

The p-trap traps condensate (water) so that air cannot pass through. Because the coil is under positive pressure when the system is running, air would rush right out of the condensate lines.  The p-trap helps prevent this.   Condensate trickles in from the coil side causing an equal amount to trickle out the other side and down to a sewer drain or some other acceptable location.

Code requires a vent-T that allows air to get in behind the escaping water.  Someone must have thought that relatively large amounts of water would be passing through, prompting the need for the t-vent.  Normally a vent like this is required to prevent the drain from gurgling or trapping air, much like vents used in sewer lines.  I’m quite sure that condensate drains would work just fine without the vent-T, but it is required by code.

The sad thing is that even though this is a fairly simple concept to understand, all too may times it is installed with the vent-T on the wrong side of the p-trap, making the p-trap completely irrelevant.  While not a big deal (the leakage out of the t-vent is only a few cfm), it does say a lot about the installer.  I can’t tell you how many times I’ve seen this.  I would guess probably 30% of the time.  If they don’t understand how a p-trap and vent works, how are we supposed to trust them around gas piping and refrigerant lines?

By the way.  I did my BPI field exam in a friend’s house a while back.  They had a brand new furnace in their attic.  The p-traps were wrong.  We also discovered that the gas line leaked where it was attached to the furnace.  It was only finger-tight.  They never used a wrench to tighten it down.  Coincidence?

Image

Here is a little quiz for you.  If the pressure inside the coil is 90 Pascals, how much higher will the water level be on the right side of the p-trap compared to the left side in the diagram above?  Answer below.

Image

If 249 Pascals equals one inch of water column (iwc), then 90 / 249 = 0.36 iwc.  So the water would be displaced by 0.36 inches.  In the lower digram it would not displace much, if any, because the pressure is escaping out of the vent-T.

Duct Size vs. Airflow – Part 1

65 Comments

If you are enjoying these posts and  learning something, you may enjoy my class, “HVAC 1.0 – Introduction to Residential HVAC“.  I will be adding more classes and dates regularly, please subscribe to my newsletter, The Sierra B.S. Newsletter.  (B.S. stands for building science, of course) by sending an e-mail to info@sierrabuildingscience.com.  If you know anyone who may benefit from this kind of information, please pass it along.

Today’s topic is Duct Siz vs. Airflow.  This is Part 1 of a two or three part series on this topic.

One of the big misconceptions about airflow is how to determine how much air will flow through a certain size duct, or conversely, determining what size duct you need to deliver a certain airflow.  You would not believe the range of flows I have heard as “rules of thumb”.  This assumes that you have done the calculations necessary to determine how much air is needed in a room.  That will be a different series of blog posts, to be sure.

Duct sizing is covered very well in ACCA Manual D and is fairly straightforward.  For now just suffice it to say that there is a very important number called “Friction Rate” that determines the relationship between duct size and airflow.  Friction rate describes the average pressure drop per 100 feet of duct in a system.  Notice that this number is unique to a system, not just an individual duct run.  For example, all things being equal, an 8” duct at the end of a long convoluted duct system will not deliver as much air as an 8” duct on a very short straight system.  This is because everything that the air passes through has an impact on how much air comes out of the very end.  Friction rate is a wonderful number because it takes into account how much static pressure you fan is providing, how much of that is left after you subtract out the big-ticket items like the coil, filter, supply registers and return grilles.

A common system configuration.

But, you say, most systems do not have runs that are 100 feet long!  What use is that number that is “per 100 feet”?  Actually, if you look at something called “equivalent lengths” a duct run can be well over 100 feet “long”.  Equivalent lengths are numbers that can be looked up in an appendix of ACCA Manual D.   This is where a fitting such as a t-wye or elbow is assigned a number that represents a length of straight duct that that has an equal pressure drop.  For example a t-wye might have an equivalent length of 10 feet.  A ninety degree elbow might have an equivalent length of 15 feet.  A round start collar coming off of a sheet metal supply plenum can have equivalent lengths approaching 30 feet or more.  When you add up the actual lengths and the equivalent lengths, it adds up quickly.

Even if the length of the run is very short, you can still use friction rate because the 100 feet is just a number they decided to use.  They could have used pressure drop per 10 feet or even 1 foot.  It just adds more decimal places.  Don’t dwell on it.  Move on.  Get over it.  Just don’t forget about it.  One of the biggest mistakes I’ve seen contractors make is to confuse total operating static pressure (inches of water column) with friction rate (inches of water column lost per 100 feet).

The details of how to calculate friction rates are covered later, but a very common friction rate for a reasonably well-designed designed system is 0.1 iwc/100’.  You can take that number and using a duct slide rule, duct calculator, or friction rate chart and determine duct size for a given airflow or determine how much air will come out of a given size duct.

Table 1 – Duct Size vs. Airflow at a Friction Rate of 0.1

Table 1 is an example of the airflow that you would get from various size vinyl flex ducts in a system with a friction rate of 0.1 iwc/100’.

Now, I’m taking a huge risk by putting this table out there and I will probably get a lot of grief for it, but here it is.  The danger is using it on systems where the friction rate is something other than 0.1.  (I use this table all of the time as a first guess, ball park number and it works fine.  Of course, I fine-tune the calculations later, but it’s always pretty close.  It’s a hundred times better than some of the numbers I’ve heard contractors rattling off.)

One of the first comments I used to get on my designs was that odd size ducts are not used.   Did I mention that I have done about 2000 residential HVAC designs?  Ninety-nine percent of them were for medium to large production home builders.  What they meant to say was that odd size ducts are not normally stocked by their local wholesaler.  That’s because none of the contractors used them.  Supply, demand, etc., etc.

What if you did a detailed load calculation (ACCA Manual J), carefully selected equipment (Manual S), and knew exactly how much air each room needed.  Now you are in the process of sizing ducts (Manual D).  Let’s say that you had a room that needed 95 cfm.  If you were a contractor who did not use odd size ducts, your choice would be between a 6″ duct, which does not give you enough air, or an 8″ duct with gives you almost twice what you need.  Which would it be?  Six inch, of course.

NO!

Suck it up and use 7″ duct, cheap skate!

Here’s some other interesting ways to use this table.  If you have a room that needs 197 cfm and another right next to it that needs 72 cfm what kind of t-wye will you need to serve these two rooms?  To deliver at least 72 cfm, you will need a 6″ duct.  To deliver at least 197 cfm you will need at least a 9″ duct.  The trunk that serves these two ducts needs to be able to deliver 72 + 197 = 269 cfm.  Using Table 1, that means a 10″ trunk.  By the way, a duct that is split into more than one duct is called a “trunk”, just like a tree.  Ducts that are on the end of a trunk and terminate in a register are called . . . branches!  How about that?  And that’s why we call registers “leaves”.  Just kidding.  Nobody does that.

So, the t-wye will need to be a what is commonly referred to as a 10-9-6 sheet metal t-wye.  Any contractor who complains about this not being and “off-the-shelf” fitting probably has not done many installs from a carefully designed plan.  If they really complain, just tell them to round the odd sizes UP, Making this a 10-10-6 t-wye.

Next:  Part 2 – Why two 6″ ducts will not deliver the same air as one 12″ duct.  Seems obvious, doesn’t it.  Stay tuned.

Again, all of these blog posts are based on the training materials and topics covered  in my HVAC 1.0 Class.  If you know anyone who might benefit from this kind of information, please refer them to my website.  www.sierrabuildingscience.com.

Thanks!

Russ

School of Though #4: High Sidewall Register

8 Comments

As I mentioned in my previous post, the Four Schools of Thought for Ceiling Register Placement are 1. Register Over the Window, 2. Register interior to room., 3. Register in Center of Room, and 4. High Sidewall Register.  All four schools of thought can work just fine (in terms of comfort), when done correctly.  Comfort, however, is not the only factor to consider.  Energy efficiency, materials efficiency, ease of installation, and aesthetics are all things to consider as well.  This post will look at all of those factors for this particular school of thought: High Sidewall Registers.  By the way, unless I say otherwise, I’m focusing on cooling mode on a very hot day. 

If I were designing my own house and had to choose between one of the four schools of thought, this is the one that I would probably choose.  Actually, the house I’ve designed in my head that I would like to build for myself would have floor registers, but between the four schools of thoughts for ceiling registers, this is the one I would choose.  Ok, Ok, I already admitted that high sidewall registers are not ceiling registers, but they fall into the category of having ducts overhead.

Sidewall registers should always be the “bar type” registers.  These are designed to throw the air roughly perpendicular to the surface they are mounted in, as opposed to ceiling register that have a throw distance measured parallel to the surface they are mounted in.  Bar type registers are designed to handle roughly twice the airflow of a low-end stamped face register of the same size and at a similar sound rating and pressure drop.  You also get much better throw distances.

The air can be directed across the room toward the load.  It travels in the upper unoccupied zone of the room and has plenty of time to mix with the room air.  This helps prevent cold air from blowing directly on people.  Something else interesting occurs called “entrainment”.  This is when the stream of air coming out of the register pulls room air up toward it, improving mixing and distribution.

On the negative side, the worst part about high sidewall registers is getting the duct to the back of the register.  I cheated on my diagram.  I confess.  I do not show the duct that serves the register.  In the previous three examples, true ceiling registers, it is obvious.

There are two basic ways to get the duct to the back of the high sidewall register, one works very well and one does not, but both require some extra steps that some architects and/or framers will not like.

The most common method is to drop a short rectangular can down the wall, in between the studs.  This is not a good idea for a lot of reasons.  1. The fittings are expensive.  2. There are a lot of extra feet of equivalent lengths in those fittings.  3. The typical stud bay is 3.5 x 14.5 inches.  A rectangular sheet metal can of that size is barely equivalent to a 7” duct and that’s if you don’t insulate the metal.  4. The top plates of the wall have to be cut out.  This weakens the wall structurally.  5. The sheet metal fittings can make noise when they heat up and cool down.  This is called “oil canning”.

The better way to run ducts to the back of a high sidewall register is to have the room being served have a higher ceiling than the adjacent room and run the duct above the lower ceiling. 
For example.  If the bedroom had 9’ ceilings and the hall had 8’ ceilings, this leaves a 1’ area at the top of the wall that the register can poke through and the duct can run straight into the back of a standard boot.  Another idea is to drop the ceiling of closets.  All of these, of course require a cooperative architect who is willing to do this.

So that wraps up the four schools of thought on where to put ceiling registers.  Don’t hesitate to leave a question or comment.

Coming up next:  Duct Size vs. Air Flow – Misconceptions Shattered Here.  STAY TUNED!

School of Thought #3: Register in Center of Room

3 Comments

As I mentioned in my previous post, the Four Schools of Thought for Ceiling Register Placement are 1. Register Over the Window, 2. Register interior to room., 3. Register in Center of Room, and 4. High Sidewall Register.  All four schools of thought can work just fine (in terms of comfort), when done correctly.  Comfort, however, is not the only factor to consider.  Energy efficiency, materials efficiency, ease of installation, and aesthetics are all things to consider as well.  This post will look at all of those factors for this particular school of thought: Register in Center of Room.  By the way, unless I say otherwise, I’m focusing on cooling mode on a very hot day.

Register in Center of Room

While not very common in California residential design, this ceiling register location has a lot of experience in the commercial world.  It is also, by far, THE most common location used in the Las Vegas area and across the arid Southwest where they know a thing or two about cooling.  This location has a lot going for it, from very practical (four-way square registers have no direction to worry about, so installers are less likely to install it wrong) to very effective (because the air is coming out in more directions, there is better mixing).  Recall from earlier discussions that one of the goals of a supply register is to mix the supply air with the room air as quickly as possible.  Four way registers do this better than one-way, two-way and three-way registers.

The center of the room location works the best with a four-way, square register.  Using another type of register can potentially lead to problems.  I would never recommend a two-way or one way register in this location.  It should also be noted that it is usually not possible to put the register in the very center of the room because there is often a light fixture or ceiling fan there.  In that case, the register should be moved a foot or so toward the exterior wall.  There is nothing wrong with having the register above the blades of a ceiling fan.  In fact, if you really want to get the air in a room to mix, just run the ceiling fan while the AC is running!  It’s as good as a blender.  Hmmm . . . I wonder if anyone has tried putting the supply register directly above a ceiling fan and wire the ceiling fans to the AC fan so that they all run at the same time . . . hmmmmm . . .

The downside to this location is that there is about 4-6 more feet of ducting per register than option #2 (register interior to room), but less ducting than option #1 (register over window).  In summary, for cooling dominated climates, option #3 has more upside and less downside than the previous two options.


School of Thought #2: Register Interior to Room

1 Comment

As I mentioned in my previous post, the Four Schools of Thought for Ceiling Register Placement are 1. Register Over the Window, 2. Register interior to room., 3. Register in Center of Room, and 4. High Sidewall Register.  All four schools of thought can work just fine (in terms of comfort), when done correctly.  Comfort, however, is not the only factor to consider.  Energy efficiency, materials efficiency, ease of installation, and aesthetics are all things to consider as well.  This post will look at all of those factors for this particular school of thought: Register Interior to Room.  By the way, unless I say otherwise, I’m focusing on cooling mode on a very hot day.

This is also a very common location.  Though it is not my preferred location, this is where I located most of the registers in my designs.  This location does not have such die hard supporters as the register-over-the-window location.  It does however have a lot more benefits when done correctly.  Again, it is very easy to screw these up. To do this location correctly, it should be a three-way register or the less common one-way register.  It should blow toward the wall opposite of the door and/or toward the primary load (window).  I highly recommend a curved blade register that allows the air to hug the ceiling more, like this one:

Rather than one like this one:

I also highly recommend that you find some register manufacturer catalogues and learn how to read them.  There are some very important performance factors that you should understand.  Throw distance, sound rating, pressure drop, etc.  It’s more complicated than you think.  ACCA has a Manual T (Terminal Selection) that discusses all of these, but it is a bit out of date.

Like I said, it’s easy to screw these up.  I’ve seen two-way registers put in this location.  Not good.  Half of the air goes right out the door.  The other half never helps the room volume near the window.  If you notice in the top view diagram, above, some of the air goes right out the door.  I call this “short circuiting”.  It would be better if that air stayed in the room longer.  The one-way register does not have this problem.  It can be minimized in the three-way register by using the adjustable control dampers behind the face blades to direct the air toward the exterior wall.  I have set up a pretty simple test rig using a duct tester fan and a fog machine to show that you can get most of the air to go that direction without reducing airflow significantly.

I almost forgot!  I couple posts ago I posed a little quiz question:   What’s better for heating a room, floor registers or ceiling registers, and why?  Most people will say that floor registers are better because hot air rises.  Sorry, that is incorrect.  Yes, hot air does rise, but you have to remember the sole purpose of a supply register: to efficiently and effectively MIX the conditioned air with the room air.  One very good rule of thumb (as much as I despise most rules of thumb) is to blow the air in the opposite direction that it will naturally want to go.  If hot air comes out of a floor register it will go up . . . and stay up.  This does not promote good mixing.  In fact, it promotes stratification.  If you blow hot air downward, it will reach close to the floor (with a properly selected register) and then begin to rise, but by that time it has mixed with the room air making it less likely to stratify.

This same rule of thumb can work for a register in a room.  Blow the air in the opposite direction that it will naturally want to go.  In a typical room the natural direction is out, toward the door, back to the return.  Assuming that the return is out in the hall, better mixing is achieved by putting the register near the door and blowing it away from the door.  This is why the interior register tends to work better than the register over the window.  Another benefit is less ducting, which equates to less resistance to airflow and conduction.

Next post: School of Thought #3 – Center of Room.  The most common location for new homes built in Las Vegas!

School of Thought #1: Register Over the Window

6 Comments

As I mentioned in my previous post, the Four Schools of Thought for Ceiling Register Placement are 1. Register Over the Window, 2. Register interior to room., 3. Register in Center of Room, and 4. High Sidewall Register.  All four schools of thought can work just fine (in terms of comfort), when done correctly.  Comfort, however, is not the only factor to consider.  Energy efficiency, materials efficiency, ease of installation, and aesthetics are all things to consider as well.  This post will look at all of those factors for this particular school of thought: Register Above the Window.  By the way, unless I say otherwise, I’m focusing on cooling mode on a very hot day.

Putting a register above the window seems to be one of the most common locations in homes for many, many years.  It also seems to have the most ardent and dedicated (aka, stuck in their ways) practitioners.  Having put about 2000 residential HVAC designs to paper, I’ve received a lot of, shall we say “comments” about my plans.  No matter where I put a register, there was always an HVAC contractor who did not like that location.  The one location that most contractors would insist on was over the window.  The reasoning went from logical (this directly addresses the major load in the room), to rule of thumb (I was always taught that you had to “wash the windows”), to experience based (I’ve been doing it this way for 30 years and it has always worked fine), to nutty (it pushes the heat/cold back out the window).

When done correctly it can be very effective and maintain good comfort, but it does have some serious drawbacks.  The correct way to do this option is to use a two-way register oriented parallel to the window.  alternatively and bar-type register can be used with the air directed in a manner similar to a two-way register.  Using the wrong register can seriously screw this option up.  I’ve seen three way registers located here, but blowing back into the room or worse, blowing directly on the window.  Both of these can result in serious comfort and energy issues.

The down sides to this school of thought include:

  • compared to other locations, it requires the most ducting, which increases materials costs, conductive losses, and pressure drop.
  • If the roof pitch drops down over the window, the register boot can be very close to the roof decking.
  • Because the air only comes out in two directions it doesn’t mix as well and can cause cold spots if directly in the path of the airflow.
  • If located too close to the window, it can blow air directly on the window.  This increases the delta-T across the window, increasing conduction through the window.

Next Post:  School of Thought Number 2 – Interior to Room

The Four Schools of Thought on Ceiling Register Locations

2 Comments

As promised, here are the “Four Schools of Thought on Ceiling Register Locations”.  See diagram below.  OK, so the fourth option is technically not a ceiling register, but it is often used as an option.

First some assumptions: 1. slab on grade house, floor registers are not an option; 2. It is a standard sized bedroom with a door on one side and a window on the opposite wall; 3. the return grille is outside the room; 4. the diagrams show cooling airflow (heating would be similar.

The blue arrows are the primary flow direction, which is the direction of the airflow caused by the velocity and momentum of the air as it leaves the register.  The purple arrows show the secondary flow direction, which is the direction of the airflow after it has lost its initial velocity.  Another way to think of secondary flow direction is the direction the air already in the room moves right when the system fan turns on.  Generally speaking, this is the direction the air is going to go to reach the return grill.

I’m sure all of you are dying to know which one of these is the best!  Well, I hate to burst any bubbles but, when done correctly, they all are very, very close.  They all have pro’s and con’s, which will be discussed over the next few posts, but in terms of comfort, which is based on even temperature in the room, they are all very close.

Notice that I was very careful to say “when done correctly”.  It is very easy to screw up any one of these by using the wrong type of register.  The first option should always be a two-way register, never a three-way or one-way.  The second option should always be a three-way, but one-way registers can work too.  It should never be a two-way.  The third option should always be a four-way, possibly a three-way or circular (radial) register.  The fourth option should always be a bar-type register directed perpendicular to the wall.

The Next Best Thing Since Sliced Bread!!!!

Leave a comment

Or not.  I stumbled upon this little ad when I was looking for a good price on the foam I use to build Duc-Blocs.  I’m sure that the good folks who spent many tens of thousand of dollars developing this product and brining it to market understand the concepts of Manual D and Manual T (not to mention S, RS, H, P, – oh, yes – and J).  Hopefully they weren’t just pandering to granny’s and uncle Joe’s desire to muck with the airflows in each and every room of the house.  Ay, caramba.  My next post will be a discussion of the “Four Schools of Thought on Where to Stick a Supply Register in a Room”.  Until then, can you guess what they are?

Here’s a little quiz question to dwell on: What’s better for heating a room, floor registers or ceiling registers, and why?

Image

Older Entries Newer Entries