Home

“Conditioned” Attics

8 Comments

(Image stolen from the internet.)

I will first confess that I have not done a lot of hard research on this topic.  I simply don’t have the time. The question has come up so often that I thought I would just brain-dump what I do know.  Think of this article as “How I would design my own house”.  Not necessarily how you should do it and I’m certainly not critiquing anyone who chooses to do it differently.

First, I really try to avoid calling them “conditioned attics” unless I’m able to do the Dr. Evil air quotes while I’m saying it.  To me, “conditioned space” is somewhere you would want to spend a lot of time and be comfortable and therefor provide heated and cooled air.  The reason we condition our homes is to be comfortable.  Yes, these attics are within the conditioned boundary, the thermal envelope, etc.  That doesn’t mean they are or need to be provided with supply air.  The stud space between interior walls is inside the conditioned envelope as well, but I see no need to blow expensive supply air into my wall cavities.  Why waste perfectly good conditioned air where no one will spend any time?  These, like an encapsulated attic, are “indirectly conditioned spaces”.  They are conditioned by conduction and convection from “directly conditioned space”.  Yes, the mechanical code does refer to “conditioned attics”, but I think that is to easily indicate that they are unvented with the primary insulation is above the attic rather than at the home’s ceiling.  I do not think that the mechanical code is implying that these attics are or need to be kept at a certain temperature.  I do recall there being a code saying that you should not provide conditioned air to a space unless it had a certain fire rating, which amounted to sheet rock over the insulation and framing.  I suggest you research that in your area.

I know that in California the energy code (Title 24, part 6) gives you a big energy savings credit for having your ducts in “conditioned space” over having them in an unvented, insulated (encapsulated) attic.  So, many people say, “Well, if we just put a supply register up there, we can call it conditioned space and take the credit.”  Last time I checked, the folks in charge frowned on that.  This topic really, really needs to be clarified.

I personally do not think it is a good idea to share attic air with the house no matter how well sealed and insulated it is.  Now, I’m talking about an attic where, when looking into it, you can see the insulation at the roof deck and you can see the backside of the sheet rock on the ceiling and all the wood framing and wiring and such.  Is that a place you would want to spend a lot of time, even if it was a comfortable temperature?  If your child wanted to move their bedroom into the attic, would you let them?  I wouldn’t, unless it was sheet rocked, taped, textured, painted and provided with lights, ventilation, a safe ladder/stairs, etc.  But then it would no longer be an “attic”, would it? 

My point is that the air quality in an attic is questionable, at best.  There is still a lot of discussion over the safety of spray-on polyurethane foam insulation (SPF) and off-gassing.  Which is how most people encapsulate their attic.  Even if you used a different type of insulation, would you want to breathe that?  Putting a supply register in the attic without any exhaust ventilation in the attic is basically forcing attic air into your house. Even worse is putting a return grille in your attic.  By the way, I would seal my ducts extra well.

If it were my house I would ensure a one-way path of airflow from the house to the attic then outside, never from the attic to the house.  ASHRAE 62.2 provides guidance on ventilating homes for indoor air quality (IAQ).  It requires a certain amount of outside air to be introduced to the home.  Though it can be combined with local exhaust for bathrooms and kitchens, I prefer not to.  It can be a relatively small, continuous flow of air into and/or out of the house (supply, exhaust, or balanced).  It needs to have a switch to turn it off in case of poor outdoor air quality.

This is how I would do it if I were designing my own house with an encapsulated attic: I would provide continuous supply ventilation to an extra deep return boot as shown in the diagram, below.  I would only deliver just enough to satisfy the ASHRAE 62.2 requirements for OA.  I would also put a fan of the same size, maybe a little bigger, in the attic to exhaust the attic air to outside.  This would ensure that the house is positively pressurized relative to the attic.  If the house were super tight, I would put a pressure relief grille in the ceiling between the house and the attic with a backdraft damper.  I would try to put it at the opposite end of the attic from the attic exhaust fan.  Having house air exhaust through the attic would help keep the attic closer to house temperature without wasting supply air.  One could argue that this is balanced ventilation because it provides both supply and exhaust to/from the house, which ASHRAE 62.2 allows you to deliver even less than just supply or exhaust.  I’m not against outside air.  I just think that dilution is not the only solution to pollution.

Some comments on this type of supply OA ventilation: It is much preferred over the more common exhaust ventilation because you know exactly where the air is coming from.  It is unconditioned air, so you don’t want it to blow on people or have it affect the thermostat prematurely, and it has to be filtered.  I’ve designed systems like this that were installed in production homes.  One time I asked a homeowner how often they changed the little filter.  They said, “Oh, we never have to.  It never gets dirty!”  I reminded them that the dirt collects on the back side – the side you can’t see.  They said, “Oh.  I better go check it.”  Dumping the outside air here allows it to be very well distributed in the house when the system is running, which, if properly sized, should run a lot on really hot or cold days.  Dumping it upstream of the main filter has the advantage of greatly reducing the impact of the main system blower fan increasing outside airflow.

I’d love to hear how you would do it in your own house and why.

Russ

—————————————————————–

Addendum, based on feedback from colleagues:

A couple points that I should have made clearer in the post:

  1. This is for a hypothetical new construction house that I might build on our property in northern CA (hot-dry climate). 
  2. It would be an accessory dwelling unit (ADU) of about 1200 sf.  I would make sure that the house and roof deck are very well sealed.  Since the house is only 1200 sf and 3 bedroom with balanced ventilation.  The minimum continuous OA rate is only around 50 cfm.

The supply fan is continuously pushing fresh air into the house.  The exhaust fan in the attic is continuously pulling air from the house via the one-way damper in the ceiling, across the attic and out.  They are on the same switch in case they need to be turned off, but the are intended to run continuously.  The two fans would be essentially balanced and the house and attic would be essentially neutral pressure.  I was weighing whether it would be better to have the fan in the house or attic be slightly larger.  I’m opting for the attic fan to be slightly larger. I would size the one-way damper so that the attic is slightly more negative than the house.

The main reason I proposed this type of system is as an alternative to putting a supply register in the attic, but I think it has a lot of interesting benefits.  The fact that you are pulling a continuous flow of house air across the attic makes it more likely that the attic is close to the house in temperature without wasting supply air.  It’s a balanced ventilation system that avoids the cost, complexity and maintenance of an ERV/HRV.  It provides continuous attic ventilation.  Most people who install ERV/HRVs want to pull air from the bathrooms, not the attic.

All that being said, I think this ventilation design in this house would work fine in any climate, maybe not in a larger or more complex house.  Regarding the unconditioned OA being dumped behind the return grille in a hallway, an idea I’ve toyed with (in case there was a complaint in the homes we did this in) is some sort of one-way damper on the return grille to force the OA to go up into the ducts rather than down through the grille.  I think the air would be dispersed enough to not be noticed on mild days.  I’d have to think about the potential for condensation inside the ducts in very humid climates.  Perhaps a dehumidistat behind the return grille that turns on the central fan if it gets above a certain humidity.

I Own My Book, Again!

3 Comments

In 2007 I started a company called Sierra Building Science (SBS). It was primarily a training organization which at one point had a training center in historic Old Sacramento that could handle up to 30 students. It eventually moved to a warehouse where we also manufactured Duc-Blocs and Flow-Boxes for testing duct leakage and airflow.

In 2012 I experienced some serious health issues (undiagnosed diverticulitis that ruptured and put me in the ICU and caused a blood clot near my liver). Those were tough times. (Ask me about having to give myself a shot in the belly every day.) SBS suffered greatly during that time, but I used the down time to finish and publish a book called “HVAC 1.0 – An Introduction to Residential HVAC Systems” that was, and kind of still is, the only book of its kind: a book for people who need to work around HVAC equipment, but not necessarily work on HVAC equipment.

I ended up selling the company and the rights to the book to a company that hired me on full time. A regular paycheck is very attractive when you have one son in college and another about to go to college. The book was never really promoted very well, although it has been sold through TruTech tools for many years (Thank you, even though I never saw a penny of those sales.). SBS changed hands when I went to work for a second company in 2017. I eventually left the second company in late 2021 to focus full time on Kwik Model. They were not pleased about that and refused to sell me back the rights to SBS or the book. In fact, they made me pay full cover price when I bought 30 copies from them for a college course I teach. I had given up on ever owning it again.

Recently, the company that owned it surprisingly and very unexpectedly shut their doors. I contacted them and was able to buy SBS all back for a very fair price. SBS and my book are now back in my hands and I am very grateful. You will be hearing more from SBS in the future and I will definitely be promoting the book and working on an updated edition. You can buy it through TruTech (for a bit cheaper) or you can buy it here: www.sierrabuildingscience.com Thanks, everyone.

Excellent New Resource for Homeowners with Comfort Issues

Leave a comment

In conjunction with DIYLoadCalcs.com, we have started a brand new Facebook group called “Fix My HVAC” to provide a place where homeowners can ask questions in a safe, no pressure environment. I invited some of my industry professional friends to join as advisors and the first 50 or so members are already a who’s who of HVAC influencers, along with some of the very best HVAC contractors I know. Homeowners, if you are having any unresolved comfort problems in your home, or are thinking of doing any major work to your HVAC system, this is an excellent, well-moderated place to ask questions and get answers from some of the brightest minds in the residential HVAC world. Contractors/Service Techs, if you are stumped by any comfort issues, you are welcome to ask questions here too. Feel free to refer friends and family here as well. Take advantage! Please see the group rules for suggestions on how to form your questions for the best responses.

Why Homeowners Should Do Their Own Load Calculations

2 Comments

What is DIYLoadCalcs.com? 

DIYLoadCalcs.com is a brand-new website that helps homeowners calculate the heating and cooling loads on their own homes.  New technology and software have made this possible just in the last few years.  Previously, to do a load calculation on an existing home an expert had to visit the house and create an accurate floor plan of the house using a tape measure and pad of graph paper.  They then had to transfer all that information, including wall, floor, ceiling and window areas, plus all of the efficiency information about the house into complicated software program that could perform the load calculations.  Even simple “block loads” normally took hours and could only be done by an expert.  Now we can do very detailed room-by-room load calculations in a fraction of the time and the data can even be collected and uploaded by the homeowner.

Kwik Model 3D has teamed with CubiCasa to create a system that allows a homeowner to scan their house with their phone and complete an online survey.  This information is sent to Kwik Model 3D, a cutting-edge load calculation and energy modeling software.  A real live load-calculation expert double checks and fine tunes the inputs and provides a detailed load calculation report back to the homeowner, along with the input file containing the 3D model of the home that, if desired, can be used later for final HVAC design and energy modeling.  The cost of this service is much less than hiring someone to do it for you.  Plus, you own your load calcs and they are not “fudged” in favor of the contractor trying to sell you equipment.

Why should a homeowner do their own load calculations?

Heating and cooling load calculations are critical to understanding exactly how much heating and cooling a house needs.  Bigger is not better!  This cannot be over-emphasized.  An oversized heating and/or cooling system will cause more comfort complaints than an undersized system, use more energy, and shorten the lifespan of equipment.  Because of the time and energy needed to do load calculations the old way, they were rarely done.  Instead, contractors just guessed and they always oversized the equipment, thinking that bigger equipment was “playing it safe”.  They were wrong and homeowners have suffered for it.  Room-by-room load calculations are very valuable for diagnosing airflow problems in homes, typically caused by undersized ducts and poor air balance.  Now YOU own these load calculations and you can require that contractors take them into account when sizing equipment for your home.

Why don’t HVAC contractors do the load calculations?

Simply put, because load calcs are time-consuming and no one wants to pay contractors to do it.  Ideally, contractors should do a load calculation when they bid on a system installation job.  Homeowners have gotten so used to “free estimates” that it is difficult for contractors to justify load calcs on a project that they may not win.  This has gone on for so many years that most contractors have either forgotten how to do proper load calculations or never bothered to learn, with the exception of a few very good HVAC contracts out there who provide excellent design services. Note: There are other fancy scanning load calculation programs out there that contractors can use, but then you are stuck with that contractor.

Can HVAC contractors use this service too?

Absolutely!  It doesn’t matter who collects the information or who pays for the service.  Plus, contractors who use Kwik Model 3D for full design work will get the 3D house file so they can continue the equipment selection process and final duct design and layout. 

How much does it cost?

The base price is $0.05 per square foot of conditioned floor area of the home.  There are small additional fees for extra floors, conditioned basements, and homes with multiple HVAC systems. The minimum price is $100.  We will give you a final price before we charge you anything.  A $100 deposit is required prior to starting work.  You will have the opportunity to review and approve the report before it is finalized.  Once finalized, you will receive a detailed room-by-room load calculation report with guidance on how to interpret them, and some suggestions on how to cost effectively reduce your heating and cooling loads, which will make your home more comfortable and energy efficient.

CubiCasa (www.cubi.casa) is free to use and you get a free detailed floor plan of the home as part of the scan.

We only provide load calculations.  If you want additional design services (equipment specification and duct design), we can happily refer you to one of our Kwik Model 3D Users.

How do I start?

Visit www.diyloadcalcs.com and follow the instructions!

For more information contact orders@kwikmodel.com

Understanding Heat Pumps (for Homeowners)

2 Comments

Hi Everyone,

The wonderful folks at the Sonoma County office of Energy and Sustainability asked me to do a 1 hour webinar on how heat pumps work. The target audience is homeowners, so it needed to be pretty basic. I think it turned out pretty well. There was a great turnout and it generated a lot of interest.

I used a lot of images and examples from a book I wrote almost ten years ago called, “HVAC 1.0 – Introduction to Residential HVAC Systems”, which is intended for “folks who work around HVAC systems, but do not have to work on them”. I no longer own the rights to that book, because I sold that company, Sierra Building Science, company a long time ago. It is still a good book and still available. I hope you will check it out.

Click HERE to view a recorded version of the webinar. I’d love to hear what you think.

Sonoma County has some amazing energy efficiency programs. If you live in Sonoma County, you would be crazy not to take advantage of them.

Thanks!

Russ

FREE On-line Residential HVAC Design Training

2 Comments

NOTE: These classes are done. A very similar class was recorded and posted on our YouTube Channel, here: https://www.youtube.com/watch?v=1IrMBbjEgjE&list=PL_287eMrjGiH1w1YTsWbAj83lxrhcUioC

Hi Everyone,

Just wanted to pass this along. I’ll be teaching a couple classes in the next couple of weeks.

The great folks at Southern California Edison’s (SCE’s) Energy Education Center in Tulare, CA are hosting free residential HVAC Design Training

Featuring the Award-Winning Kwik Model with EnergyGauge Loads!

Not only is Kwik Model an awesome 3D design tool, but its 3D virtual environment makes it the best training tool available.

The first class is an introductory class, followed the next week by two classes (Parts 1 and 2), one on Tuesday and one on Wednesday.

The introductory class is optional, but recommended.

Part 2 is a continuation of Part 1 – please register for both

Anyone can attend these classes and participate from anywhere.

Check out these FREE LIVE (on line) classes – class descriptions below:

Intro to Residential HVAC Design in 3D

Tuesday, March 1, 2022

2:00 p.m. – 5:00 p.m. (Pacific)

Register Here

3D Residential HVAC Design (No CAD Required) – Part 1

Tuesday, March 8, 2022

2:00 p.m. – 5:00 p.m. (Pacific)

Register Here

3D Residential HVAC Design (No CAD Required) – Part 2

Wednesday, March 9, 2022

2:00 p.m. – 5:00 p.m. (Pacific)

Register Here

Class descriptions:

Introduction to Residential HVAC Design in 3D

This class will be an introduction to ACCA Manuals J, S and D (load calculations, equipment sizing and duct design) using a new 3D HVAC design software. Rather than drawing the house in a CAD software, this software “builds” the house out of scalable 3D boxes. The benefit of 3D design is that it helps make sure that the system being designed will actually fit in the house and gives a better indication of duct length, surface area, bends and fittings. Attendees should have a good working knowledge of HVAC terminology and concepts.

Course Objectives: 

• Understand the basics of building geometry.

• Understand the basics of heating and cooling load calculations.

• Understand the basics of heating and cooling equipment selection.

• Understand the basics of duct layout and sizing.

• Understand the importance of good airflow on cooling equipment capacity and efficiency.

• Understand the importance of proper register/grille location, sizing and type.

Target Audience:

• HVAC Contractors

• HVAC Designers / Architects

• Energy Consultants

• HERS Raters

Learning Level:

Basic Class: Content is introductory in nature and requires no prerequisite knowledge or experience to grasp the concepts or participate in exercises. Basic educational activities and materials are meant to establish a foundation of knowledge and competence that will be expanded upon in practice or in higher level seminars and workshops.

Prerequisites: Attendees should have a good working knowledge of HVAC terminology and concepts.

3D Residential HVAC Design – Parts 1 and 2

Part 1 will cover load calculations and equipment sizing according to ACCA Manuals J and S (duct design according to Manual D will be covered in Part 2). The training will be based on a new 3D HVAC design software. Rather than drawing the house in a CAD software, this software “builds” the house out of scalable 3D boxes. The benefit of 3D design is that it helps make sure that the system being designed will actually fit in the house and gives a better indication of duct length, surface area, bends and fittings. Attendees should have some basic experience using an HVAC design software and/or knowledge of ACCA Manuals J/S/D, and a good working knowledge of HVAC terminology and concepts. It is highly recommended that you take Part 1 before taking Part 2. Part 2 will be held at the same time the following evening.

Course Objectives: 

• Understand the basics of how building geometry affects load calcs.

• Understand the basics of heating and cooling load calculations.

• Understand the basics of heating and cooling equipment selection.

• Become comfortable with the basic commands of Kwik Model with Energy Gauge Loads software.

Target Audience:

• HVAC Contractors

• HVAC Designers / Architects

• Energy Consultants

• HERS Raters

Learning Level:

Intermediate Class: Content is appropriate for individuals who possess a fundamental understanding of the topic and have familiarity with basic terminology and methodology of the subject matter. Attendees should have the capacity to participate in instructor-led exercises requiring synthesis and application of concepts.

Prerequisite: Basic experience in HVAC design software and/or knowledge of ACCA Manuals J/S/D and an understanding of HVAC terminology and concepts.

Don’t miss out.

Mark your calendars now.

We hope you can make it!

Relieving the Pressure: Bypass Grilles, Jumper Ducts, and Dedicated Returns

2 Comments

(Image borrowed from the internet.)

Disclaimer:  The vast majority of my HVAC design experience is for new construction, production homes, in hot-dry climates (CA and NV).  I’ve estimated that I designed at least a couple thousand plans, each plan built many times in multiple orientations.  I never had any significant comfort complaints result from my designs.  We always used Manual J/S/D.  We designed to high airflow (>400 cfm/ton) low-ish external static pressure (<0.6 IWC) and we were careful not to oversize the air conditioners.  We also field tested most of these designs.  This article is based on that experience.  I don’t claim to be an expert on the topic of room pressurization, nor have I done a whole lot of research on the topic.  I’m just sharing my experience and opinions so that, good or bad, others may add it to their knowledge base and make informed decisions. Please feel free to comment and give your opinion and experience.

To start, let’s define the problem.  First, imagine a house with no interior doors and one central return grill in a hallway.  The return path from a supply register in a bedroom is out of the room through the door and down the hallway.  The rooms and hallways are essentially return ducts – nice, big, open ducts with little to no resistance to the air.  I think (I hope) we can all agree that in this situation, there would be no need for ducted return grilles in every bedroom.

Now add the interior doors.  These doors are essentially dampers in our nice big return ducts.  When these door/dampers are closed it creates significant blockage in our nice big return “ducts”.  I think (I hope) we can all agree that it’s the doors that are causing the problem.  Theoretically, they stop the air from leaving the room, which prevents supply air from entering the room, potentially causing under-conditioning of the room.

  1. My first question is:  How often and when are these doors closed?
  • My second question is: When a door is closed how big is the impact on the supply air flow to that room?
  • My third question is: How should we address the problem caused by closed doors?

My experience designing and testing HVAC systems in homes leads me, personally, to the following answers:

#1. Not often enough during peak load conditions to be a problem.

#2. Not big enough during peak load conditions to be a problem.

#3. What problem?

Keep in mind that the homes I design are very energy efficient (compared to other homes built at that time), the systems are properly sized, and the ducts are well designed for good airflow. This means that during peak loads (very hot days) the system is running almost continuously, the air is mixing well, and the supply air is not coming out of the registers super cold or super hot.  I never really made a big effort to check, but I recall that most of the bedroom doors in these homes had decent undercuts, say, 1” above the flooring.  I should also mention that I always insisted on a dedicated return in the master suite. If all these boxes are checked, I contend that pressure relief in secondary bedrooms is not necessary for comfort reasons.

I always try to make a point to say this in every class I teach: “A well-designed system will forgive a lot of sins.”  What I mean by that is a house with a properly sized system (not oversized) and good airflow will work fine despite:

  • Less than optimal register locations
  • Less than optimal room by room air balancing
  • Less than optimal thermostat location
  • Less than optimal owner behavior, and
  • Some room pressurization

The reason I emphasize comfort a couple paragraphs earlier is because there may also be energy efficiency reasons for pressure relief.  The Florida Solar Energy Center (FSEC) did a study on how room pressurization increases infiltration (exfiltration) and therefore energy consumption.  I have not read this study yet and do not know how tight these homes were, how often the doors were closed, how effective the door blocked airflow, how well the ducts were sized, etc.  Assuming that there is increased energy consumption, a cost effectiveness evaluation is warranted to justify pressure relief strategies.  As we will see, some strategies are more expensive than others.

I have tested houses designed by other people where there were severe comfort issues and room pressurization seemed to be part of the problem.  They installed pressure relief strategies and the problems mostly went away, but unfortunately, they also did other fixes, such as increasing return air capacity, sealing ducts, etc., so it is impossible to know how much impact the pressure relief strategies had or how much of a problem they were to begin with.

I guess you could say that my most used pressure relief strategy is to have big supply air ducts.  By “big” I mean a lot bigger than those installed by people who do not used Manual D.  I might put an 8” duct in a room where someone else might think a 6” duct is fine.  In very simplistic terms, when your duct system is big, the air is moving slower, the pressure drop into the room is lower and the overall system can compensate more easily to parts of the system being blocked off.  For example, if you were to close off a register in a room in a house with “big” ducts, that back pressure is easily absorbed by the rest of the system.  If the house had small ducts, the new back pressure is felt all the way back at the fan.  In other words, the pressure behind the closed off damper at the register is greater in a system with small ducts than in a system with large ducts.  I have not personally tested this, but if that damper is now the bedroom door, rather than the register, the pressure in the room should also be less when the ducts are big, all else being equal.  On the other side, one could argue that a system with big ducts is more likely to reduce airflow to a room when a door is closed because there is “room” for it to go elsewhere.  True, but the room is less pressurized, so the energy impact is reduced.

So, other than big ducts, what are the more common pressure relief strategies?  I categorize them as follows:

  1. Louvered bypass grilles
  2. Jumper ducts
  3. Dedicated ducted returns

I will evaluate them based on the following qualities (or lack thereof):

  • Balance/Comfort –Does it reduce the impact of opening and closing doors and thereby increase comfort?
  • Noise/Privacy – We have doors on rooms for a reason.  Does the pressure relief strategy allow outside noise to disturb the room occupants? Does it allow private conversations inside the room to be eavesdropped on from outside the room?  Note that this is very hard to quantify and varies widely from family to family.  I personally think this issue gets more attention that it deserves, but I never lived in a large family.
  • Aesthetics – Is it ugly?  Is it visually conspicuous?
  • Cost – Is it expensive to install relative to the other options?
  • Energy – Does it increase energy consumption?

Here are the three strategies, in detail:

  1. Louvered Bypass Grilles

These basically just provide additional pressure relief much like the undercut of the door.  They are usually the simplest and easiest to install.  They can be as simple as a louvered door, or back-to-back grilles in an interior wall (one side to room, one side to hallway), or ducted high/low grilles on either side of an interior wall.

There are some very nice-looking louvered doors available.  Personally, if I could design my own house from scratch, it would have fully louvered doors everywhere but on the bathrooms.  I just like the look and the good air circulation.  Doors can be fully louvered or partially louvered.  Even off-the-shelf panel doors from the big box stores have room at the bottom to install a 6” tall louvered panel.  These louvered door panels are common in commercial applications

Image from www.trudoor.com

Back-to-back louvers are similar but, in a wall, rather than a door.  See drawing, right side.

High/low louvers are similar but to mitigate sound transmission one side is up high and one side is down low.  See drawing, left side.  I have never seen these installed.  I heard of someone who wanted to, but a sharp building inspector pointed out that the section of the code that prevents us from using unducted building cavities as return ducts could apply here and that the stud bay should probably be lined with an approved ducting material.   In a hot-dry climate, I would not have any issues with passing room air through a well-sealed, unlined, stud bay, but in a humid climate it could be a mold issue. 

Sizing these louvers is tricky.  It depends on a lot of things.  I’m sure there are fancy equations for calculating the pressure drop of the various options, but I prefer empirical data and experimentation.  A target pressure differential across the door that I have seen referenced many times is 3 Pa.  I’m not sure how this number was arrived at, but it seems reasonable.  If you don’t like it, pick a target – the lower, the better.  It would be quite easy to build a test chamber using a calibrated fan, such as a duct tester and test different size louvered configurations at different airflows.  If the grilles you are using have good performance data, such as for supply registers, you could use that to predict pressure drop too. Be sure to account for the door undercut, or just use that as “safety margin”.

Here is my “scoring” of louvered bypass grilles as a pressure relief strategy.

  • Balance/Comfort – Very good.  Assuming proper sizing these should perform fine.
  • Noise/Privacy – Probably not good, especially fully louvered doors.  With louvered grilles I can imagine a younger brother being caught with his ear to a louvered register spying on his big sister’s phone conversations.  (It’s amazing what you can hear with your ear to a floor register when the system is not running, but no one complains about that.)
  • Aesthetics – I love the look of louvered doors, but then, I also like jalousie windows because they remind me of living in Hawaii as a child and the windows on our old VW camper.  On the room side, louvered grilles can be hidden behind furniture, but they might not look great on the hallway side.
  • Cost – Louvered doors can be pricey.  Back-to-back louvers installed in walls (or doors) are probably the cheapest of all options mentioned here.  High/low louvered would be expensive if you had to duct the wall cavity, otherwise pretty cheap.
  • Energy – Great.  No negative impact on energy use.
  • Jumper Ducts

These are very common in some parts of the country and in some energy efficiency programs.  They are probably the most common pressure relief strategy.  They are similar in function as louvered bypass grilles.  They provide an alternative return path past the door in addition to the door undercut.  The main difference is that they are in the ceiling rather than a wall and they are ducted.  There is one register in the room and then there can be a shared register or individual registers in the hall or common area.  When the system is running and the door is closed the air goes up into the register in the ceiling of the room, through the duct and out the register in the hall and back to the return.  See diagram.

Again, sizing of the ducts and registers can be tricky, but I have seen some sizing charts that people have put together specifically for this application.

Here’s my evaluation of jumper ducts:

  • Balance/Comfort – I think these are very good too.  Assuming proper sizing, they should work very well.
    • Noise/Privacy – Definitely better than the louvered bypass grilles.  Being up in the ceiling and ducted limits most sound transfer.
    • Aesthetics – Probably better to have the grilles in the ceiling than in the walls.  The ability to share the hallway grille helps too.
    • Cost – Substantially more than louvered bypass registers.  You have a ceiling boot at both ends, the duct material and the labor to install it all.
    • Energy – If the bypass duct is in conditioned space, there should be no energy impact, but this is probably rare.  In the more common scenario of jumper ducts in a vented attic, I think the energy impacts are their biggest disadvantage. They increase surface area for conduction, and unless perfectly sealed, they increase building infiltration.
  • Dedicated Ducted Return

This is basically putting a return duct in every bedroom.  Each bedroom will have a supply and a matching return, presumably sized to handle the same amount of air.  As I mentioned earlier, I insisted that all my designs had a dedicated return in the master bedroom.  This was because in new homes the master “suite” was quite large.  They usually included the master bedroom, master bath, toilet room walk in closets and sometimes a separate retreat area. The amount of supply air going to that side of the main door was quite large and the pressure across the closed door could be substantial.  I had good success with this strategy, but occasionally I found that if the owners kept the master bedroom door closed a lot, like all day, that room was not well monitored by the thermostat out in the hall and sometimes the temperature drifted away from the thermostat setpoint.  In larger homes that had more than one system, we often put the thermostat in the master bedroom for that reason.

  • Balance/Comfort – Poor.  Now, I’m admitting a bias here.  I only designed one project where the builder insisted on returns in every bedroom, and it was a nightmare.  This was a subdivision of large (3500-5000 sf), one-story production homes.  There were three or four models.  The builder was new to Las Vegas and had previously built homes on the east coast.  Despite my objections, he insisted that a return in every bedroom is what made a house a “quality” house.  The problem was that the City of Las Vegas required balance testing on the sales models of all subdivision projects.  This meant you had to measure and report all supply and return airflows at every register and they had to be within 10% of design.  This was a very hard criteria to meet for regular systems.  I had no idea how hard it was going to be for multiple-return systems.  At that time they did not specify if the test was to be performed with bedroom doors open or closed, so we tested both ways in hopes that one would pass more easily. 

I won’t go into the specifics, but even though we very carefully sized the ducts according to strict Manual J/S/D protocols, it was a nightmare to balance these systems.  Here’s just a small example:  We would measure the supply and return airflows to a bedroom with the door open.  They would be different despite being the same size ducts, registers, duct length, everything.  It is impossible to intentionally make the total equivalent length (TEL) of a supply and return duct be the same.  We could adjust the registers and maybe some balancing dampers until they were close, but then we would close the door and measure airflows.  They would both change by different amounts!  Without making any further changes, we would open the door and measure again.  Would they go back to the original measurements? NO! They would be totally different than before.  No other changes were made.  It was infuriating.  It has to do with the fact that there are two pressures acting on the room instead of just one and that there is more than just static pressure forcing air down certain pathways in the ducts.  There is also velocity pressure.  Think of it as the momentum of the air.  When you change velocity pressure it changes the way the air “wants” to go.  When you change the static pressure back, the air might say, “Nah, I kind of liked going this way.” 

I suspect that few contractors who install systems with returns in every bedroom ever had to balance them like we did.  If they had to, I’m sure they would find an easier way to achieve pressure relief.  Once we finally got them dialed in I told the builder that because he insisted on dedicated returns against my advice, we would not be responsible for any additional “fine tuning” requested by homeowners.  There weren’t many requests, fortunately, but the systems weren’t as trouble free as one would have expected for all the extra expense and work that went into them.

Despite that bad memory, I also think there are other problems caused by this design strategy.  I alluded to it earlier where I mentioned putting the thermostat inside the master suite. Everything, of course, depends on the system and layout, but for the “typical” system I have found that comfort is best achieved when the thermostat is measuring a good representative sample of all the air in the house.  This depends greatly on the thermostat location and that is a whole other topic to discuss later.

When a system is running, you want the air passing by the thermostat to be a good representation of air from all the rooms.  When you give a room its own return you effectively take that room out of them mix.  You take away its “vote”, so to speak.  If the thermostat is in the hallway where the bedrooms are and all bedrooms have their own returns, that hallway can actually become stagnant with no moving air.  Thermostat location is very important in these types of systems.

  • Noise/Privacy – Good. No sound transmission
  • Aesthetics – Good. Fewer registers than the other options.
  • Cost – Poor.  Much more expensive than the other options.
  • Energy – Poor.  Unless ducts are located within conditioned space, this strategy will greatly increase duct leakage and convection.  Also, note that longer return ducts add significant equivalent lengths to the entire system, which changes the friction rate for every run.  This potentially could require larger ducts on both the supply and return sides to compensate for this additional resistance.

Conclusion

I can’t emphasize enough that a good design (not oversized equipment, good airflow, low design ESP) greatly reduces the need for these types of “enhancements” to a ducted HVAC system. 

Secondly, I don’t want to discount the induced infiltration and energy problem.  It is worth evaluating the energy savings vs the cost of these strategies on a case-by-case basis.  More research is needed here.  I suspect that in tighter homes with better designed duct systems, the impact is greatly reduced.

Lastly, until I have seen some detailed temperature vs time data logger analysis of systems with and without different pressure relief strategies, I will be skeptical of their overall benefit to comfort.  Here’s why: If closing a door supposedly creates pressure, which reduces supply air to a room, then the result would be an underconditioned room (hot in the summer, cold in the winter).  What I have actually heard from as many homeowners as not, is that the rooms where the doors are often closed get over conditioned.  In fact, in my own house, in heating mode, if we close our master bedroom door, it gets too hot at night.  If we leave the door open, it’s just fine.  We do not have a return in that room, btw.  This makes no sense to me.  Clearly there are other factors at play besides just a pressure difference across the door and it will take more to remedy than just pressure relief.

Ceiling Registers vs. Floor Registers

2 Comments

Which is better for distributing heated air to a house, ceiling registers or floor registers?

This seems like an easy question. Hot air rises so blowing the air up would improve the flow. This makes sense on the surface, but let’s look deeper.

First of all, let me make it clear that if the system is properly designed, both will work just fine.  But, all things being equal, is one better than the other, even if only slightly?

Recall that the purpose of blowing heated air into a room is to maintain a constant temperature over time and an even, consistent temperature everywhere in the room.  That temperature is whatever the thermostat is set at. Let’s say that’s 70 degrees.  When the heating system stops, the room begins to cool off.  Hopefully the thermostat will sense that and turn the heating system back on. This cycling on and off can cause problems.

The air that we are blowing into the room is substantially hotter than the air in the room.  In other words, we are adding concentrated btus into a volume of air to replace the btus that the air has lost.  It’s sort of like adding red food coloring to white frosting, but the red keeps fading away and we have to keep adding more concentrated red coloring.  We want the frosting to have a very even color, no dark streaks (hot spots) and no light streaks (cold spots).  To do this we have to mix as much as we can.  Mixing is the key to even temperature distribution in a room.

The next thing to look at is the register itself.  What is the purpose of the register?  Take a typical stamped-face 2 way ceiling register and a similar floor register.  Why are there 2 directions?  To send the air to different parts of the room, of course.  Why do we want to do that? So we don’t have hot spots and cold spots.  In other words, the register is designed to distribute the air around the room, which is another way of saying to mix the air

Also notice that the registers are angled to direct the air away from whatever surface the register is mounted in.  Ceiling registers throw the air down and floor registers throw the air up.  Also notice that they have a horizontal direction, parallel to the ceiling or floor.  This horizontal distance the air travels before slowing down to a certain velocity is what is referred to as the “throw distance”, but there is also a significant vertical component.  Register manufacturers provide specifications for their registers, including throw distance, static pressure drop, and noise criteria, at different face velocities and flow.  Again, supply registers are intended to push the air to all parts of the room to ensure even temperature distribution.  So, hopefully you will agree, that the key factor for selecting a good register location (and type) is to promote mixing

Another issue that comes into play is that warmer air is less dense than colder air.  Notice the “-er” at the end of those two important words, warmer and colder.  It’s not correct to say that “hot” air rises, but of course when people say that they usually mean “hotter”.  Hotter air rises in the presence of colder air.  It’s relative.  Most people would consider 120 degree air “hot”.  I could make 120 degree air come out of a wall register and sink to the ground like fog at a Transylvania cemetery.  How?  Make the room 160 degrees first.  Not very practical, but you get the point.

How do we reduce stratification? By reducing the temperature difference (delta T) between the room air and the supply air.  How do we do that?  One way is to reduce the supply air temperature by increasing cfm.  You can do this by increasing ducts sizes and reducing restrictions.  You can also do it by increasing the speed that the air handler runs on in heating mode.  Other than that, the easiest and best way to reduce the temperature difference between two masses of air is the mix them.  The sooner the air mixes together, the less chance there will be of stratification.

So, how do we mix the air?  A giant blender in each room would be great.  That’s basically what a ceiling fan is.  Ceiling fans are awesome! Make sure it is blowing up in the winter and down in the summer.  They beat the air like a scrambled egg, virtually eliminating stratification. Unfortunately, they use electricity and home owners tend to leave them on too much. Other than ceiling fans, we can help the air mix with register placement and selection.  Mixing is helped by turbulence.  Turbulence is created by making the air do things that it doesn’t really want to do.  Blowing the air the opposite direction that it wants to go can create turbulence, like a bunch of people going out the entrance of a building while other people are trying to come in, like cars going the wrong way on a freeway.  If hotter air wants to rise, blowing the air up will only get it up to the ceiling faster, where it will stay.  Blowing hotter air down will make it go down through the colder air and then fight its way back up, by that time it has mixed and cooled off: lower delta T = less stratification.

Note that there are two types of air movement in a room that is caused by the incoming supply air.  The primary airflow is caused by the force and velocity of the air coming out of the register.  The secondary airflow takes over when the air has lost its momentum and other forces take over.  These forces are usually stratification (buoyancy pressure) or the fact that the room is being pressurized, assuming there is no return grille in the room, the air has to leave the room and is being pushed out by the air coming in behind it.

Note that higher face velocity of the air coming out of a register can improve mixing but it can also have other negative affects, such as higher static pressure drop (resistance) and noise.  It’s very important to realize that face velocity is completely different than the velocity of the air in the duct.  You can have extremely slow air in a large duct and very high face velocity if the air is coming out of a small register.  Velocity is cfm/area.  The area of the duct is usually very different than the net free area of the register.

The image below shows what happens when hotter air is blown up into a colder room.  The primary airflow sends it up toward the ceiling and there is little secondary airflow to make it go anywhere else.  This exacerbates stratification.

Image from HVAC 1.0 – Introduction to Residential HVAC Systems

This next image shows what happens when hotter air is down into a colder room.  The primary airflow sends it down toward the floor and the secondary airflow causes it to want to rise back up toward the ceiling.  This promotes mixing and reduces stratification.

Image from HVAC 1.0 – Introduction to Residential HVAC Systems

Based on this and with all else being equal (airflow, delta T, face velocity, etc.) registers in the ceiling are more likely to promote mixing of heated air blown into a room and the ceiling is therefore a better location for supply registers in heating mode than floor registers.

Friction Rate Explained (Maybe)

8 Comments

Table 1 – Duct Size vs. Airflow at a Friction Rate of 0.1

Friction rate is is that number that you use on a duct calculator (aka, duct slide rule, ductulator, etc.) to figure out what size duct you need for a certain airflow.  It is one of the most complicated concepts to understand in the ACCA Manual D duct design methodology. It is even harder to explain to others (as you can tell by the length of this blog article). I have tried many times, with mixed success. I will try again now. At the very least you can laugh at my stupid analogies.

One of the biggest mistakes people make with friction rate is confusing it with static pressure. I’ve had people very confidently tell me that they “always use half inch on my ductulator because that’s what they design their total airflow to”. This makes me cringe. That means they are using 0.5 instead of something like 0.1, which means that they are expecting a bit more than twice as much air from a given size duct than what it will really deliver. Please, please, don’t do this. I’ve actually had people get quite angry with me for correcting them on this. Sorry. I’m just the messenger.

TESP is the total static pressure that your fan feels. Some of the pressure is on the return side and the fan has to pull against that pressure. Some of the pressure is on the supply side and the fan has to push against that pressure. The fan has no idea what is causing this pressure. It is just a dumb box with no eyes, ears or antennae. All it feels is negative pressure on one side and positive pressure on the other side. Those pressures could be caused by a box with a bunch of holes drilled in it, or a bouncy house, or a 3-mile-long sheet metal duct, or a tuba, or something else. It doesn’t matter. What matters is that you add those two pressures together, supply and return, (ignore the negative sign on the return pressure) and that’s the TESP. That’s how hard the fan is working. The harder it has to work, the less air will come out. Simple. Always, keep it simple.

The TESP is what the manufacturer’s airflow tables use to tell you how much airflow (cfm) the fan will deliver. The airflow table (chart, graph, whatever) tells you that at a certain TESP and a certain speed tap (high, med, low, etc. – let’s keep it simple and just focus on high speed), this fan will deliver a certain airflow, cfm. Friction rate is something completely different, related, but different. One is a total and one is a rate of something happening, like miles and miles per hour.

Another big mistake that “designers” make is that people assume that their systems will operate at a certain static pressure just by hooking up ducts and turning it on. They’ve heard a million times things like “ this fan delivers 400 cfm per ton at 0.5 inches of water column (iwc)”, so they just assume that’s what’s happening. They don’t realize that you have to design as system to those specifications for it to actually happen. In other words, if you want 400 cfm/ton, you have to design the ducts system so that the furnace only “feels” 0.5 iwc. Whether or not the furnace feels 0.5 iwc depends ultimately and completely on what kind of system it is attached to. It’s even worse for variable speed fans. People think they are magic and that no matter what kind of system they hook it up to, it will magically deliver the target airflow. Do not make this mistake.

So, how do you do design a duct system that will make the fan feel a certain static pressure? That’s where friction rate comes in. Friction rate allows you to pick a desired airflow, determine the static pressure needed to deliver that airflow (from the airflow tables) and then design the ducts around that static pressure to ensure that you get your desired airflow. These are the basic steps:

  1. Pick a desired cfm (e.g., 400 cfm/ton)
  2. Look at the airflow table and pick a TESP that will give you that cfm (e.g., 0.5 iwc).
  3. Calculate a friction rate based on that static pressure (e.g., 0.1 iwc/100’)
  4. Use that friction rate to size the ducts.
  5. Install the system, turn it on and you get the TESP you wanted (or less) and the cfm you wanted (or more).

Simple. Well, pretty simple.

Then why don’t more people do these steps? Because dummies like me keep continually throwing out numbers like 400 cfm/ton, 0.5 iwc, and 0.1 iwc/100’ in all their examples and everyone says, “If that’s what they always are, why do I need to bother calculating them?” Well, that’s a valid question. Those numbers are “typical” numbers, averages. If you were to design thousands of similar systems, they would all average out to about these numbers. I’ve done, it. It’s true.

Unfortunately, it’s not that simple. There’s enough variation between unique houses and individual equipment brands that you can’t just make these assumptions. That’s a recipe for trouble. Just like assuming that a 3 ton AC will give you exactly 36,000 Btuh. It won’t. Trust me. (Hopefully, those last few sentences don’t come as a surprise to you. If they do, you better read ACCA Manual S, quick.)

An analogy is fuel economy in cars. Some cars are less than 10 mpg and some are more than 30. Let’s say the average mpg for all cars is around 20. If you have to buy the exact amount of gas it takes to go a certain distance and assume you will get 20 mpg without knowing what kind of car you will be driving, chances are about 50/50 that you will run out of gas.

When furnace manufacturers design their fans-in-a-box, they typically shoot for a certain target airflow because that’s what everyone is used to, usually 400 cfm/ton. Some are better (higher airflow), some are worse. Not only does it vary between manufacturers, but it varies within difference sizes of the same furnace line. A two-ton furnace (the furnace that they intend to be paired with a two ton condenser) might give you 860 cfm at 0.5 iwc (430 cfm/ton). But the five-ton furnace (the furnace that they intend to be paired with a 5 ton condenser) might only give you 1920 cfm at 0.5 iwc. (384 cfm/ton).

The vast majority of my designs were for large production home builders who sent our designs out to get bids. Some big production home builders had national accounts with certain HVAC equipment manufacturers, so we could use those specs. Some did not, which meant that our design had to be generic – not specific to one brand. To do a generic design, we typically had specs from 5 or 6 of the top manufacturers and averaged the all the specs and then used design criteria that was worse than the average. (We didn’t want to eliminate any manufacturers by using criteria they couldn’t meet.) When we did his averaging, guess what the static pressure, and airflow typically turned out to be – Right around 400 cfm/ton at 0.5 iwc!

Whatever airflow and TESP you choose, the key is that you design your duct system to that TESP, as opposed to assuming that it will just magically happen. Remember the 5 steps I mentioned above? We are on now onstep 3, calculate a friction rate. (Finally, he’s talking about friction rate!)

So, what is friction rate (FR) and how is it different than TESP? You may have noticed in the previous explanation that the units are different. TESP is inches of water column (iwc) and FR is inches of water column per 100 feet (iwc/100’). TESP is a static pressure and FR is pressure lost as you move down the ducts. If you start with 0.25 iwc and have a friction rate of 0.1 iwc/100’, that means you can go 250 feet before you run out of pressure to push the air. Keep in mind that the static pressure at the end of the ducts, once the air leaves the register, is ZERO, by definition. TESP is how much pressure you have to burn. FR is how fast you can burn it and have nothing left at the end. TESP is like your monthly expense allowance and FR is how much you want to spend per day so that you spend it all.

FR only applies to the pressure that pushes the air through the ducts. TESP is the pressure that pushes the air through everything, ducts, fittings, filters, etc. This means you have to remove from the TESP things other than the ducts that eat up static pressure. That includes things like the evaporator coil, filters, air cleaners, dehumidifiers, humidifiers, grilles, registers, dampers, etc. These are called component pressure loses (CPL). What you are left is something called “available static pressure” (ASP), which is essentially the static pressure available to just push the air through the ducts. If you know that number and how long your ducts are, you can figure out what your “pressure budget” is. In other words, how much pressure can the air use up as I go down the ducts from the fan to the register. Sound familiar? The units of this pressure budget is iwc per foot. The problem is that when looking at just one foot it is a very small number. Going back to the monthly expense budget analogy, it would be like how much you can spend per minute. This is too small and too precise to make sense. To make it more manageable (less decimal points) they multiply it by 100 and the units are iwc per 100 feet. More like dollars per month. As long as you keep track of those 100 feet by keeping them in the units (iwc/100’), it all works out.

So, maybe a better analogy (less stupid) for TESP and FR would be a road trip. I love road trips. Let’s say have to rent a car for a business business trip and your boss gives you a total budget. TESP is this budget. ASP is how much money you have left after you plan for meals, hotel, incidentals, etc. FR is like how much you can spend, per mile, on gas.

Let’s say you start with $200 dollars total and what you have left for gas is $100. And you have to go 500 miles. This means you can spend $0.20 per mile ($100/500 miles). If gas costs $3 per gallon, you better have a car that gets at least 15 miles per gallon ($3 per gal / $0.20 per mile). No problem. If you have to go 800 miles, you can only spend $0.125 per mile ($100/800 miles), so you better have a car that gets at least 24 mpg ($3 per gal / $0.125 per mile). If you spend more on meals and you only have $80 left for gas and you have to go 800 miles, you can only spend $0.10 per mile ($80/800 miles), so your car better get 30 mpg ($3 per gal / $0.10 per mile). And so on.

So, in this road trip analogy the $200 you start with is your TESP. The $100 or $80 you have left for gas is your ASP. The distance you can travel is the length of the ducts. The amount you can spend per mile is your FR. So what does the fuel efficiency of the car represent? Well, that would be how big your ducts are. Bigger ducts are more efficient. They burn less pressure for each foot the air travels (a more efficinent car burns less dollars for each mile it travels) Note: in the analogy dollars can be converted directly to fuel ($3 per gallon), so they are basically the same thing.

Let’s see how well this analogy works.

All else being equal, if you start with a higher expense budget (higher TESP), after usual expenses you will have more gas money (higher ASP) and you can afford more dollars per mile (higher FR) so you vehicle doesn’t have to be as efficient (smaller ducts).

Another way to look at this is if you don’t want to have to drive a Prius (huge ducts), you have the following options:

  1. Start with more money (higher TESP)
  2. Not have as many expenses other than gas (less static pressure losses, resulting in higher ASP)
  3. Not drive as far (shorter ducts)

If you think about a real duct system and how far the air has to travel, the distance varies from register to register. Some registers are very close to the supply plenum and some can be very far away. Taking the road trip analogy to the next level, a duct system is like a series of roads to and from a town. The furnace is downtown. They always design roads so you have to pass through downtown. The roads traveling business people typically come in on are the return ducts. Roads that they leave town on are supply ducts. Some routes in and out of town to their final destination are shorter and some routes are longer. If you look at option 3, above, this implies that for shorter runs, you don’t have to have as big of a duct. This makes perfect sense. If you have a fixed expense budget and don’t have to drive as far, you can drive a less efficient vehicle (small ducts). If you have to drive farther, you have to have a more efficient vehicle (bigger ducts). It varies for different routes through town.   Some routes require a Prius and some can be Ferrari. (Interestingly, the analogy holds up well here because the less efficient car goes faster which is analogous to smaller ducts having a higher velocity, which is true! hmmm)

What this is really saying is that you can have a different friction rate for different paths that the air can take through a duct system. Some HVAC duct design software programs have the option to toggle between using the worst-case FR or using a variable (custom) friction rates for each run. With computers doing all the work, I don’t see any good reason to base your entire duct system on the longest run. Back in the day, when we had to do all the calculations by hand with a calculator and a pencil, it was a pain to calculate and keep track of so many friction rates. We just found the worst case and based everything on that, knowing that it would oversize the ducts on the shorter runs. But this can actually cause some serious balancing problems if there was a big difference between the longest run and the shortest run. I’ve seen it happen. To this day, I still prefer a duct layout where all the runs have about the same length because it took away, or at least lessened this difference between the worst case and best case runs. The ability to make all of you duct runs the same length of course depends on the location of the air handler relative to all the supply registers and return grilles.

By the way, using variable friction rates to size ducts will result in what is sometimes referred to as better “self balancing”. If longer ducts are relatively bigger and shorter ducts are relatively smaller, when you turn the system on the airflow delivered to each register will be closer to what you were shooting for. If however, you use the worst case FR for all of the ducts, the shorter ducts will get much more air than they need. I remember one time we did this and there was a laundry room very close to the furnace. We sized the duct using a friction rate based on much longer run and the duct was oversized. Oversized, plus being super close to the furnace meant that the laundry room got WAY more air than it needed. Unfortunately, guess what was just outside of the laundry room . . . the thermostat. This one oversized duct caused the thermostat to shut off the system way too early. The entire 2200 square foot first floor of a very expensive 4000 square foot tract home was not comfortable because of this one duct. Fortunately, this was discovered in the sales model and the fix was to just damper down the airflow in the laundry room. We adjusted the design after that and they all worked wonderfully.

Another thing to think about is that even though two lengths of ducts could be the same in terms of feet, one could have a lot more resistance than the other if one is straight and the other has a bunch of bends and turns. The road trip analogy actually explains this pretty well. Driving one mile down a perfectly straight road will result in better gas mileage than driving one mile where you have to make a bunch of 90 degree turns every block. So, the route with turns will require a more efficient vehicle (bigger ducts). But the distance traveled is the same, so how to we account for that? Manual D assigns something called equivalent lengths to bends and turns and other fittings. An equivalent length of 20 feet is like saying this bend has the same resistance as 20 feet of straight duct. Very interesting.

So, instead of just using actual duct lengths we use actual lengths plus equivalent lengths, we can account for the resistance (loss of static pressure) for turns and bends and fittings. Nice! This is called Total Equivalent Lengths (TEL)

The equation for determining gas budget per mile, let’s call that the money burn rate, on a road trip is:

                                         MBR = (TEB – UE) / MTG

Where:

                                        MBR = Money Burn Rate ($ / mile)

                                        TEB = Total Expense Budget ($)

                                        UE = Usual expenses, other than gas ($)

                                        MTG = Miles To Go (miles)


The equation for FR is:

                                        fr = (TESP – CPL) / TEL

Where:

                                        TESP = Total External Static Pressure

                                        CPL = Component Pressure Losses

                                        TEL = Total Equivalent Lengths

Notice the small ”fr”? That’s because we haven’t multiplied it by 100 feet to make it a more easy to use number. So, the actual equation is:

                                        FR = [(TESP – CPL) x 100] / TEL

Remember that (TESP – CPL) is sometimes referred to as ASP, available static pressure.

I highly suggest you memorize this equation, because it is very useful. You can shorten it to:

                                        FR = ASP x 100 / TEL

Here is the BOTTOM LINE:

Higher friction rate = smaller ducts. I have the hardest time remembering this. It comes out backwards in my brain for some reason. Just 
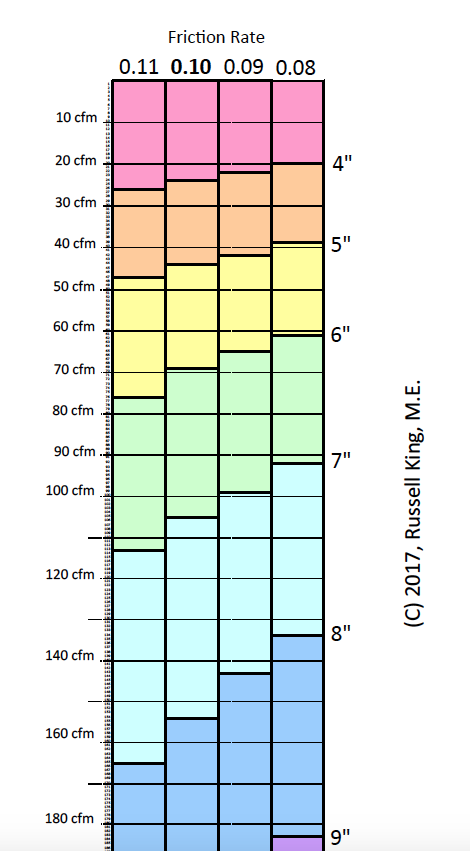
think of it like this. Smaller ducts eat up more pressure, which means more friction, which means a higher friction rate.  Here’s where it is really confusing: A system with higher friction rate will deliver more air for a given duct size.  Wait, higher friction rate is better? That’s totally counter-intuitive.  Maybe the way to think of friction rate is not as a description of the ducts but as a description of what the system can handle.  If there is plenty of ASP and not a lot of TEL then the system can handle a higher burn rate.  It’s able to tolerate smaller ducts.  It can overcome more resistance to airflow.  I hope I unconfused you.  If not, just be like me: Go back and look at something, like this blog post, and get it straight before saying something dumb.

In the diagram above or to the right, depending on your screen size, notice that at a friction rate of 0.11, a 6″ duct (yellow) will deliver up to 77 cfm.  At a friction rate of 0.08 it will only deliver 61 cfm.  In other words, if you needed to deliver 70 cfm to a room, you could use a 6″ duct if the run was shorter and the friction rate was less than 0.10, but if the friction rate was 0.09 or lower, you would need a 7″ duct (green).  Also notice that at 80-90 cfm the friction rate can be anywhere between 0.11 and 0.08 and a 7″ duct would work.  It’s only in those border regions where it matters, but it REALLY matters.  The difference between a 7″ duct and a 6″ duct at a FR of 0.1 is 105 cfm vs 70 cfm.  That’s a decrease in airflow of 1/3 by going down just one duct size!

Looking at the equation.  Things that make the friction rate smaller (ducts bigger) are

  1. Less ASP
  2. Less TESP (results in less ASP)
  3. More CPS (results in less ASP)
  4. More TEL

Putting this in plain words, bigger ducts are needed if you:

  1. Have less pressure available to push the air through the ducts
  2. Have less total pressure from the fan
  3. Have more components eating up static pressure
  4. Have longer ducts and/or more bends or fittings that the air has to travel through

Whew. Well, there you go. Friction rate can be explained as a road trip, after all. Maybe. I hope that helps explain friction rate. If not, let me know and I will try again. Maybe more graphs would help. I like graphs.

Russ


© 2020 Coded Energy, Inc. – Developers of Kwik Model 3D HVAC Design Software

A Quick and Easy DIY for Improving Air Flow in a Home

7 Comments

My friends just moved into a new (to them) home and invited us to the housewarming party. I made the faux pas of critiquing their HVAC system. This embarrasses the heck out of my wife and happens far too often. It’s very hard not to say something when you know so much about how these homes were built. In our area, I can look at the type and location of the supply registers and tell you which HVAC company designed and installed it.

Probably 95% of production homes in CA (and likely all over) suffer from undersized ducts, which results in airflows below 350 CFM per ton or so. Some much less. In the 2013 version of CA’s energy code they mandated a minimum of 350 CFM per ton and 0.58 watts per CFM. Think of 350 CFM per ton as a D- grade. One CFM less is a FAIL. The other way to think of it is as the very worst airflow you can have and still meet code. When I was designing a lot of production homes, I designed to an absolute minimum of 400 CFM/ton and they regularly tested out at closer to 500 cfm/ton because I was pretty safe sizing ducts. More airflow is generally better, especially in hot/dry climates.

A real quick and easy way to improve airflow in these types of homes is to replace the cheap “stamped face” registers with a “bar-type” register. These may go by different names but, basically, a stamped face register is the most common style. The entire face and the fins are all from one piece of sheet metal that was stamped and the fins were bent in or out. Bar type registers have a rectangular frame, but each fin is a separate piece of metal that can be individually adjusted (without bending anything). Both Lowe’s and Home Depot sell both kinds. (Search “ceiling registers”on their sites.) The easiest way to tell them apart is price. Bar type registers are roughly twice the price of the same size stamped face, which explains why stamped face are the most common in most homes. But even at $15-$25 each, it’s a cheap way to really improve airflow. A bar type register is rated for roughly twice the airflow at the same pressure drop and sound rating as a stamped face. I’ve often measured up to 20% increase in airflow by replacing a stamped face register with a bar type, occasionally more. When I lived alone in an apartment, I took all the registers off completely and it made a huge difference! Only an bachelor engineering nerd can get away with that, though. (No, “bachelor engineering nerd” is not a redundant term.)


Bar Type Register – photo from homedepot.com


Stamped Face register – photo from homedepot.com


Here is link to a 10×6 bar type register sold by Home Depot: bar type register

Here is link to a similar one sold by Lowe’s: bar type register

Note that the size 10×6 refers to the size of the register boot behind the register. The dimension of the register itself is about 1 3/4 inch bigger in both dimensions. So if you were to go through your house and measure the outer frame dimension of all your registers, you would subtract about 1.75 from each dimension to get the nominal size (round to the nearest inch). They come in pretty standard sizes, usually even numbers, 12×4, 10×6, 12×6, 8×4, etc. They might also come in steel or aluminum. Aluminum is a bit more expensive. Steel is fine unless you live in a humid area. They perform about the same.

You can also sometimes buy directly from your local HVAC supply house. Tell them you want something comparable to a “Shoemaker 950 series (aluminum) or 951 series (steel) bar type register”.

The only tools you need are a screw driver and maybe a razor knife if the registers are caulked in place. Only do this project if you are comfortable working over your head while on a ladder and the registers are easily accessible. Be super careful. I’ve seen registers located 20′ above the floor. Leave those alone. Hopefully the screws holding the registers in place are going into wood and not just sheet rock. If not, which happens too often, you may have to use some sheet rock anchors.

I suggest only replacing the registers in the more important rooms, such as family room, master bedroom, etc. Smaller rooms like bathrooms and laundry rooms usually are getting plenty of air. If you have rooms where you’ve closed down a register, no need to replace those. Also, if you live in a two story house served by a single, non-zoned system (one thermostat) try replacing just the downstairs registers first. See if you notice a difference.

While you’ve got the registers off, take some caulk or expansive foam and seal the gap between the sheet rock and register boot (sheet metal box that penetrates the sheet rock and that the register slips into). Make sure you can get the register back in before the caulk or foam dries.

If you do this let me know how it came out! Good luck. Be safe.

Older Entries