As I mentioned in my previous post, the Four Schools of Thought for Ceiling Register Placement are 1. Register Over the Window, 2. Register interior to room., 3. Register in Center of Room, and 4. High Sidewall Register. All four schools of thought can work just fine (in terms of comfort), when done correctly. Comfort, however, is not the only factor to consider. Energy efficiency, materials efficiency, ease of installation, and aesthetics are all things to consider as well. This post will look at all of those factors for this particular school of thought: High Sidewall Registers. By the way, unless I say otherwise, I’m focusing on cooling mode on a very hot day. 
If I were designing my own house and had to choose between one of the four schools of thought, this is the one that I would probably choose. Actually, the house I’ve designed in my head that I would like to build for myself would have floor registers, but between the four schools of thoughts for ceiling registers, this is the one I would choose. Ok, Ok, I already admitted that high sidewall registers are not ceiling registers, but they fall into the category of having ducts overhead.
Sidewall registers should always be the “bar type” registers. These are designed to throw the air roughly perpendicular to the  surface they are mounted in, as opposed to ceiling register that have a throw distance measured parallel to the surface they are mounted in. Bar type registers are designed to handle roughly twice the airflow of a low-end stamped face register of the same size and at a similar sound rating and pressure drop. You also get much better throw distances.
The air can be directed across the room toward the load. It travels in the upper unoccupied zone of the room and has plenty of time to mix with the room air. This helps prevent cold air from blowing directly on people. Something else interesting occurs called “entrainment”. This is when the stream of air coming out of the register pulls room air up toward it, improving mixing and distribution.
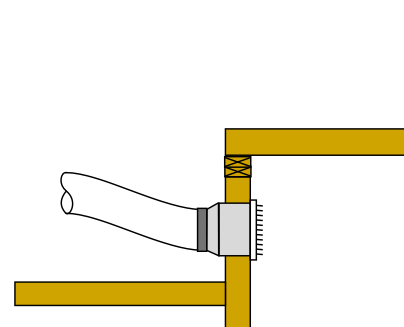
On the negative side, the worst part about high sidewall registers is getting the duct to the back of the register. I cheated on my diagram. I confess. I do not show the duct that serves the register. In the previous three examples, true ceiling registers, it is obvious.
There are two basic ways to get the duct to the back of the high sidewall register, one works very well and one does not, but both require some extra steps that some architects and/or framers will not like.
 The most common method is to drop a short rectangular can down the wall, in between the studs. This is not a good idea for a lot of reasons. 1. The fittings are expensive. 2. There are a lot of extra feet of equivalent lengths in those fittings. 3. The typical stud bay is 3.5 x 14.5 inches. A rectangular sheet metal can of that size is barely equivalent to a 7” duct and that’s if you don’t insulate the metal. 4. The top plates of the wall have to be cut out. This weakens the wall structurally. 5. The sheet metal fittings can make noise when they heat up and cool down. This is called “oil canning”.
The better way to run ducts to the back of a high sidewall register is to have the room being served have a higher ceiling than the adjacent room and run the duct above the lower ceiling.
For example. If the bedroom had 9’ ceilings and the hall had 8’ ceilings, this leaves a 1’ area at the top of the wall that the register can poke through and the duct can run straight into the back of a standard boot. Another idea is to drop the ceiling of closets. All of these, of course require a cooperative architect who is willing to do this.
So that wraps up the four schools of thought on where to put ceiling registers. Don’t hesitate to leave a question or comment.
Coming up next: Duct Size vs. Air Flow – Misconceptions Shattered Here. STAY TUNED!
 HVAC 1.0 Book – Introduction to Residential HVAC Systems
 Kwik Model 3D HVAC Design Software
May 26, 2013 @ 09:57:46
Hi Russ,
I share your affection for the high sidewall outlets. We specify the Shoemaker 901’s with airfoil shaped blades frequently, and they are virtually silent with very long throw capability. Whenever we come across vaulted ceiling rooms, we enter through the knee wall with excellent results.
Another good application is when there are decorative box beam ceilings that prohibit being able to effectively throw across the ceiling with conventional CB type outlets (curved blade ceiling diffusers). Using a 901 and entering through a decorative wall element (like a thickened wall section @ a column or soffit and using elbows to drop down and turn the air) enables one to throw across the beamed ceiling with a free air jet. We’ve successfully thrown distances greater than 25 feet with this method, keeping the air within the unoccupied zone.
Great blog- I’m enjoying your other posts as well. 🙂
May 26, 2013 @ 11:53:47
Thanks, Mike. Good information. You guys do cutting edge stuff. – Russ
Dec 30, 2014 @ 16:39:57
These are super well written and easy to understand posts. Thanks. I have condensation problems in my teanagers rooms with the door closed but not anywhere else in the house. I am wondering if I could install a very quiet bathroom fan in my staircase to transfer air from there to the 3 rooms using the wall registers you mention in your post. It would be so simple. Thanks.
Jan 09, 2015 @ 08:39:20
Hello,
Sorry it took so long to reply. Holidays and all . . .
Condensation issues can be very complicated. It will probably take a lot more than an exhaust fan to fix them. However, good circulation is certainly one part of the solution. Your bathroom fan idea would most likely help somewhat and might even noticeably improve temperature distribution. The question to ask is whether the added electricity cost is worth it if there may be an easier solution. The first thing you must always do with condensation problems is determine the source of the moisture and see if it can be controlled. There are some really good articles on-line if you search for them. Try searching “condensation problems in my house”. Also, if you are very concerned about the problem, I recommend contacting a good home performance expert in your area. Make sure they are experienced with your particular issue and be sure to ask for references. try here: http://bpi.org/individual_locator.aspx
Good luck!
Russ
Oct 08, 2017 @ 08:19:29
My contractor seems to be placing the high sidewall registers not so high. They’re not just below the ceiling but 3 1/2 feet below (10 ft ceiling). Is there a good reason for this?
Oct 08, 2017 @ 20:42:06
Thanks for your question.
I can’t think of a good reason that’s related to performance. Usually 12″ down from the ceiling is good. That leaves room for nice crown molding or something like that. The only reason that I can think of would be architectural. What’s on the other side of the wall that’s preventing them from being higher? From a performance standpoint, 6.5′ above the floor is not ideal. It also might look kind of strange. A person standing nearby will feel that air blowing on their head unless it’s directed upwards. I suggest asking your contractor for their reasoning. The most important think related to high sidewall registers is to make sure that they are a bar-type register such as a shoemaker 950 series and not a stamped face register like a shoemaker 850 series. If you want to email their answer to me, please do. russking (at) sierrabuildingscience (dot) com
Russ
Jul 18, 2019 @ 18:03:56
I am considering floor registers in a ducted mini split retrofit, primarily because there’s easy access from an unfinished basement. If possible I’ll try and get the returns up higher near the ceiling via closet chases so they don’t become dust/dirt collectors, however I’m somewhat limited by a max 0.36wg static pressure of the blower on the slim duct unit. Any advice for placement of floor registers?
Jul 18, 2019 @ 19:24:50
Hello,
Thanks for your question. It depends on a few things, but the general idea is to maximize mixing of the air with the room air as it comes out of the supply registers and travels toward the return. If possible, blow the air in the opposite direction that it’s going to want to go as it goes back to the return grille. In a typical bedroom, unfortunately, floor registers should go on the opposite wall from the door. Unfortunate, because this is usually where a piece of furniture wants to go. Also, there are not a lot of choices for directional registers for floor registers. Most of them are just 2-way.
Be careful not to oversize the equipment so it will run longer (not short cycle) and improve mixing. Make sure the ducts are properly sized (go up a size, if in doubt). Throw is determined by the velocity at the face of the register, not the velocity in the ducts. The benefit you get from getting the returns up higher might be negated by the added resistance to airflow.
I hope this helps.
Russ